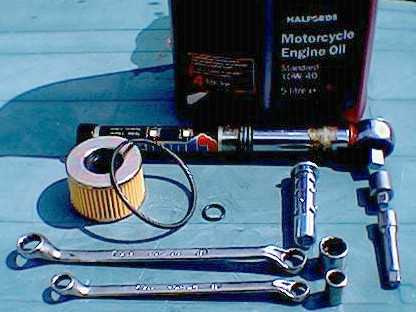
 Tools
level : 1 : 12mm, 17mm ring and socket spanners; ratchet and extension bar;
torque wrench;
plastic receptacle for the old oil. New oil filter (with large and small O rings),
and replacement motorcycle oil. Space required : 1
Tools
level : 1 : 12mm, 17mm ring and socket spanners; ratchet and extension bar;
torque wrench;
plastic receptacle for the old oil. New oil filter (with large and small O rings),
and replacement motorcycle oil. Space required : 1CX500 / GL500 / CX650 / GL650 Oil & Oil Filter Change
|
NEVER USE PATTERN (i.e. non-HONDA) OIL or AIR FILTERS! Will you risk your engine by saving a few £, $ or €? |
Skill Level : 1. Dirty
Level : 2. Work Mess Level : 2. Tools
level : 1 : 12mm, 17mm ring and socket spanners; ratchet and extension bar;
torque wrench;
plastic receptacle for the old oil. New oil filter (with large and small O rings),
and replacement motorcycle oil. Space required : 1
All nut and bolt sizes are quoted as the spanner size required to fit them.
I strongly advise you NEVER to use ANY pattern (non-Honda) parts. The cost savings are minimal and the risks are huge. Are you going to risk trashing your engine for a couple of Pounds, Euros, or Dollars?
Time : expert 10 minutes, average 15 minutes, "first-time" 20 minutes.
All the hands, tools, and bike in the photos are the author's. In some of the photos I have had to wipe my hands clean before using the camera.
I am very receptive to comments and suggestions, but you use these pages entirely at your own risk.
This page will show you how to drain the engine oil, and remove and replace the oil filter. This is extremely simple and can be done whenever desired; Honda recommend that the procedure is carried out as a matter of routine every 7,200 miles (12,000 km) for UK 500s, UK 650s, and all US models up to 1981; and every 8,000 miles (12,800 km) for other models. However many riders routinely change the oil and filter every 3,000 miles, or at the beginning of the bike's summer use.
If you have one of the 500 or 650 Turbos, change the oil and filter every 2,000 miles.
Procedure
Don't do anything until you have bought the new oil filter and oil. Honda recommend "any good quality SAE 10W/40 engine oil, API class SE or SF". In the example illustrated, I used Halford's own brand of motor cycle oil; I also use bog standard 15-40 engine oil from my local supermarket, with no ill effects.
Standard, mineral oil is best in these engines. It's worth remembering that modern synthetic, part-synthetic or any oil with additives is likely to make the clutch slip. This is because the Honda clutches are designed to run 'wet', i.e. in general lubrication splash from the engine.
Oil Sump Capacities
| Model |
Imperial
Pints
|
US Quarts
|
Litres
|
| All 500cc variants |
4.58
|
2.75
|
2.6
|
| All 650cc variants |
5.46
|
3.28
|
3.1
|
Take the bike for a short run, or allow it to idle for 10 minutes, to warm the engine to normal working temperature. This thins the oil and greatly helps the draining process.
Park the bike on its centre stand on a firm surface, turn off the fuel and ignition.
 Remove
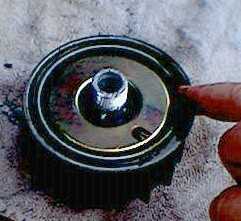
the dipstick (left) to allow air in as the old oil drains out. Be careful
where you put down the dipstick. If you stand on it and break it whilst walking
round the bike, you won't be able to ride until you have bought a replacement.
Remove
the dipstick (left) to allow air in as the old oil drains out. Be careful
where you put down the dipstick. If you stand on it and break it whilst walking
round the bike, you won't be able to ride until you have bought a replacement.
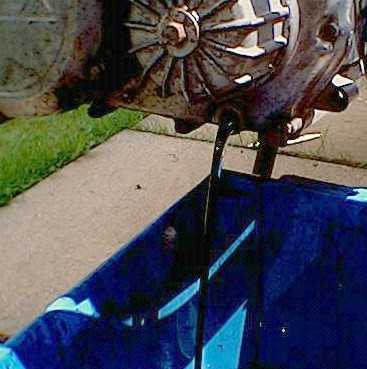
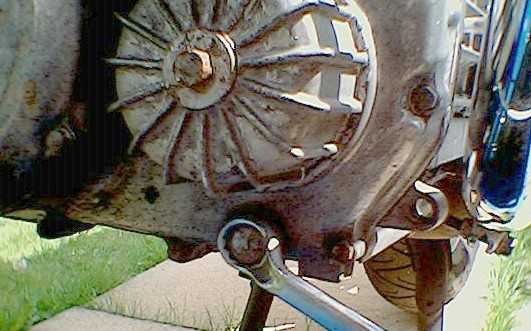 Place
the drain tray under the engine, just behind the front wheel. In the photos,
I used a small blue storage bin. Use your 17mm ring spanner to loosen (turn
anticlockwise when seen from the front) the engine oil drain bolt (right).
Note that all 650s and both Turbos have the oil drain bolt in a slightly different
place - it's under the engine casing and not as per the above photo, however
the drain procedure is the same.
Place
the drain tray under the engine, just behind the front wheel. In the photos,
I used a small blue storage bin. Use your 17mm ring spanner to loosen (turn
anticlockwise when seen from the front) the engine oil drain bolt (right).
Note that all 650s and both Turbos have the oil drain bolt in a slightly different
place - it's under the engine casing and not as per the above photo, however
the drain procedure is the same.
I recommend using a patch of old ladies' tights (or nylons) material to drain the oil through. This will immediately show up any engine debris. A few flecks of small "silver" aluminium particles, or a few fragments of gasket / sealing compound are ok, but what you really don't want to find is large pieces of debris, and - horrible! - any coppery or golden coloured flecks. The latter signifies serious engine problems, almost certainly a failing or failed big end bearing. If you get coppery or golden flakes, do not use the engine any more until you have investigated. Unfortunately, big end failure is usually fatal news for the engine, as repairs are prohibitively expensive.
Also look inside the oil filter body for any similar debris.
Be careful not to catch yourself on the hot exhaust header pipes.
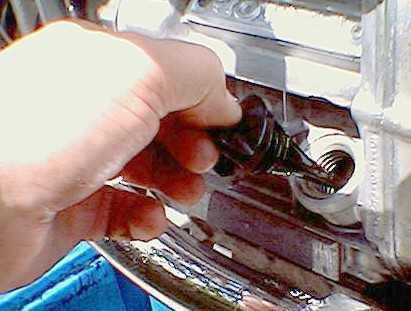
 As
soon as the ring spanner has loosened the bolt, unscrew it by hand (left)
and remove it. Don't let it fall into the hot oil or you will have to fish it
out with a pair of pliers. Oil will start to drain as the bolt is just about
to come out - careful - it's hot.
As
soon as the ring spanner has loosened the bolt, unscrew it by hand (left)
and remove it. Don't let it fall into the hot oil or you will have to fish it
out with a pair of pliers. Oil will start to drain as the bolt is just about
to come out - careful - it's hot.
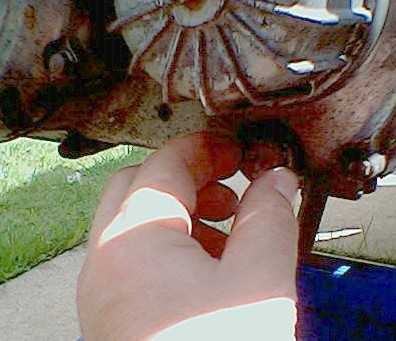
 Allow
a few minutes for all the hot oil to drain out (right). It's a good idea
to have a cloth laid out handy (left, below) where you can put down tools
and equipment.
Allow
a few minutes for all the hot oil to drain out (right). It's a good idea
to have a cloth laid out handy (left, below) where you can put down tools
and equipment.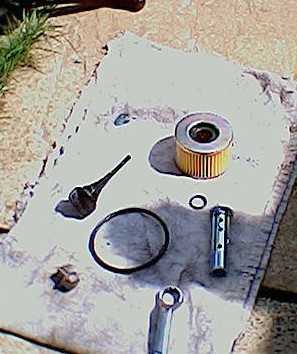
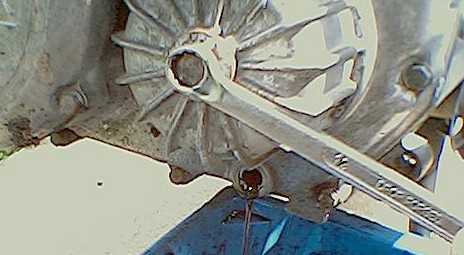 When
the oil has finished draining, use your 12mm or 17mm ring spanner (right)
to loosen the oil filter central bolt. It may be easier to to use a socket spanner
to actually unscrew the bolt, depending on how tight it is.
When
the oil has finished draining, use your 12mm or 17mm ring spanner (right)
to loosen the oil filter central bolt. It may be easier to to use a socket spanner
to actually unscrew the bolt, depending on how tight it is.
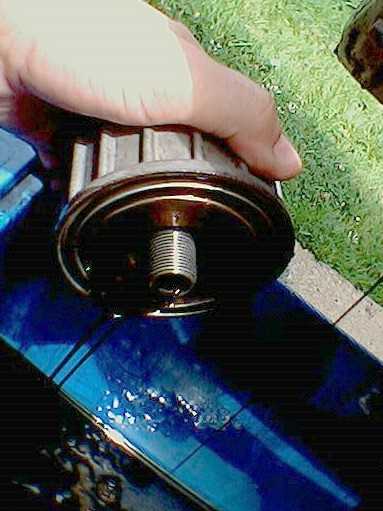
 Once
the central bolt is loose, unscrew the oil filter housing by hand or with a
spanner (left), and remove it. Quite a lot of oil will flow out - don't
worry - this is normal.
Once
the central bolt is loose, unscrew the oil filter housing by hand or with a
spanner (left), and remove it. Quite a lot of oil will flow out - don't
worry - this is normal.
There is a large O-ring sealing between the oil filter housing and the crankcase. It doesn't matter if this falls off into the drain tub, because you won't be using it again.
 Sorry
about the weird angle on this photo (right)! Tip the oil from inside
the filter housing into the drain tub. If the large O ring didn't fall into
the oil tub, recover it from either its recess in the oil filter housing, or
from where it stuck to the engine (left, below). If it's damaged, this
doesn't matter as you won't need it again.
Sorry
about the weird angle on this photo (right)! Tip the oil from inside
the filter housing into the drain tub. If the large O ring didn't fall into
the oil tub, recover it from either its recess in the oil filter housing, or
from where it stuck to the engine (left, below). If it's damaged, this
doesn't matter as you won't need it again.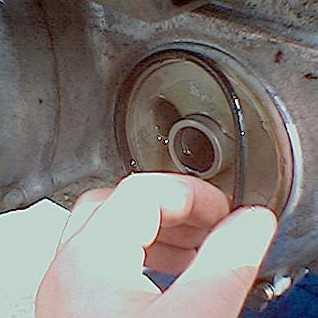
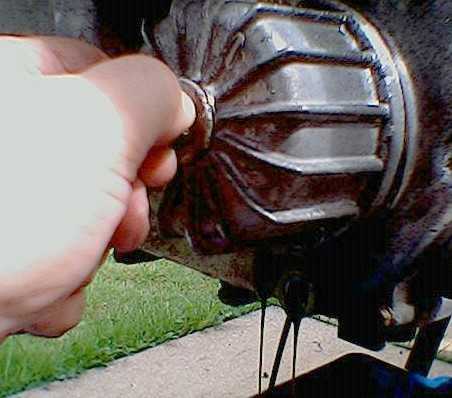
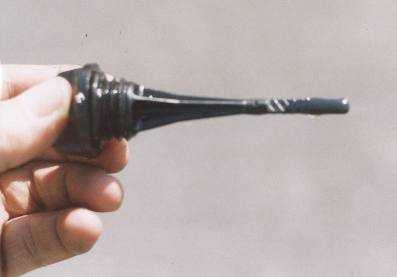
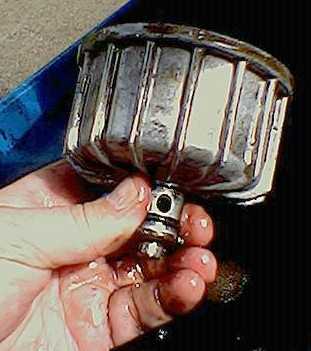 Slide
out the oil filter bolt (right) and then remove the old filter; remove
and discard the small black O ring at its throat, here seen between my thumb
and middle finger. The old filter may need to be gently prised out.
Slide
out the oil filter bolt (right) and then remove the old filter; remove
and discard the small black O ring at its throat, here seen between my thumb
and middle finger. The old filter may need to be gently prised out.
Before you discard the old filter and its large O ring, have a good look inside the paper ribbed elements of the filter, for any debris. REMEMBER - If you find metal shavings, especially coppery flakes or large silver particles embedded in the filter, your engine has probably damaged its main crankshaft and / or big-end bearings, and is in imminent danger of complete failure. This should be investigated at once. It is almost certainly an engine-out job to correct, and the most likely solution is a replacement engine.
A significant amount of silvery (aluminium) particles strongly suggests that your cam chain and tensioning apparatus is worn out. See this page for details.
Don't worry about the holes in the body of the oil filter bolt - these are supposed to be there.
Don't lose the spring and steel washer which go over the filter bolt and are located along the body of the bolt, sitting between the front-wheel-end of the filter and the filter housing. These should slide or fall out as the filter bolt is removed from the housing. They sometimes drop into the freshly drained oil - to fish them out of the hot oil, use a magnet.
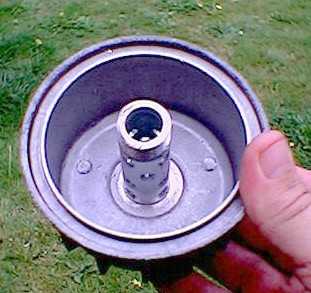 Clean
the drain bolt, spring and washer, filter housing area on the crankcase, filter
housing (left), especially the recess where the new large O ring
will be fitted.
Clean
the drain bolt, spring and washer, filter housing area on the crankcase, filter
housing (left), especially the recess where the new large O ring
will be fitted.
Honda's standard oil filter bolt has a rather soft 12mm head, which is easily rounded off after many oil changes. I have obtained an aftermarket steel version which is much stronger and has a 17mm head. UK readers can obtain one mail order from Motor Cycle Accessories, 162, Belgrave Gate, Leicester LE1 3XL UK. Tel 0116-262-4983. The correct length one of 3.1" (78mm) length is likely to be discontinued, but the 3.5" (85mm) length version is easily cut down to the correct length (don't forget to thoroughly wash any saw-debris out of the bolt afterwards).
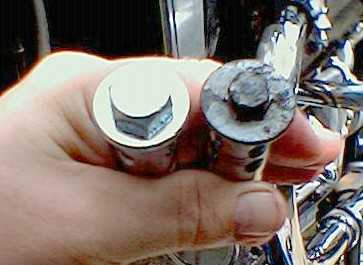 Note
the difference between the new steel 17mm head bolt (left) and the Honda
standard 12mm soft alloy version. During this particular oilchange, I fitted
the 17mm bolt you see here, and it is clear that the old 12mm one is thoroughly
worn out, almost completely rounded off. In fact to get it out, I had to use
a Mole self-locking wrench applied to the bolt's outer circumference, and you
can see the grip marks.
Note
the difference between the new steel 17mm head bolt (left) and the Honda
standard 12mm soft alloy version. During this particular oilchange, I fitted
the 17mm bolt you see here, and it is clear that the old 12mm one is thoroughly
worn out, almost completely rounded off. In fact to get it out, I had to use
a Mole self-locking wrench applied to the bolt's outer circumference, and you
can see the grip marks.
 Whichever
bolt you use, remember to fit the new small O ring around its throat (right).
The O ring is black and slides into a recessed slot just below the bolt's shoulders.
Push the bolt into the filter housing, from the outside inwards, and then slide
in first the spring and then the washer over it. (The spring ensures that the
filter is a snug fit against the crankcase.)
Whichever
bolt you use, remember to fit the new small O ring around its throat (right).
The O ring is black and slides into a recessed slot just below the bolt's shoulders.
Push the bolt into the filter housing, from the outside inwards, and then slide
in first the spring and then the washer over it. (The spring ensures that the
filter is a snug fit against the crankcase.)
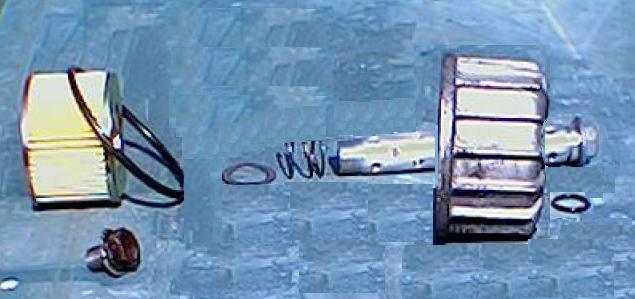 Left
to right : oil filter, large O-ring, steel washer, spring, filter housing, oil
filter bolt, small O-ring. Foreground left is the oil drain bolt.
Left
to right : oil filter, large O-ring, steel washer, spring, filter housing, oil
filter bolt, small O-ring. Foreground left is the oil drain bolt.
I've edited the photo slightly to show the correct order of reassembly, the bolt actually goes into the housing dead straight, and not at the weird angle you see here. Nor is it as long as this picture suggests.
If your engine doesn't have the spring and washer, don't be tempted to continue without them. They ensure that the oil filter is pressed firmly against the front casing, and if you omit them, oil can bypass the filter.
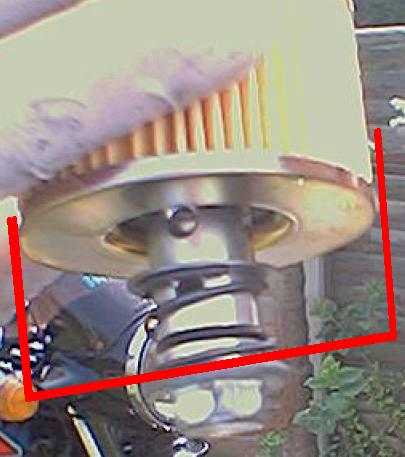 If
you imagine that the oil filter housing was transparent, this (right) is how
the component parts go in, with the body of the housing between the bolt's shoulder
and the bottom end of the spring. The red line shows where the housing would
go. The washer sits between the engine end of the spring and the rubber centre
of the new oil filter, and prevents any rubber being chewed away by the end
of the sping, in case the filter is moved about by oil pressure.
If
you imagine that the oil filter housing was transparent, this (right) is how
the component parts go in, with the body of the housing between the bolt's shoulder
and the bottom end of the spring. The red line shows where the housing would
go. The washer sits between the engine end of the spring and the rubber centre
of the new oil filter, and prevents any rubber being chewed away by the end
of the sping, in case the filter is moved about by oil pressure.
Don in Australia adds "The
spring sits against the inner face of the housing at one end, and the front
side of the washer, which it pushes against the rubber grommet of the oil filter."
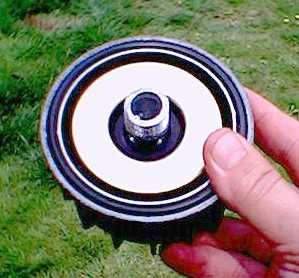
Insert the bolt fully through the outside end of the housing; slide the spring, then the washer, then the new filter, along the bolt. The spring therefore sits against the oil filter bolt, and the washer against the filter element.
 Now
push in the new filter, taking care not to damage its own black rubber seals.
It's best if you gently twist it down the length of the bolt. When seated correctly,
with the O ring in place, it looks like the picture (left).
Now
push in the new filter, taking care not to damage its own black rubber seals.
It's best if you gently twist it down the length of the bolt. When seated correctly,
with the O ring in place, it looks like the picture (left).
 Before
you fit the housing, smear some old engine oil (right) around the mating
face of the oil filter housing, all round the O-ring. This helps it seal against
the crankcase as you tighten the central bolt.
Before
you fit the housing, smear some old engine oil (right) around the mating
face of the oil filter housing, all round the O-ring. This helps it seal against
the crankcase as you tighten the central bolt.
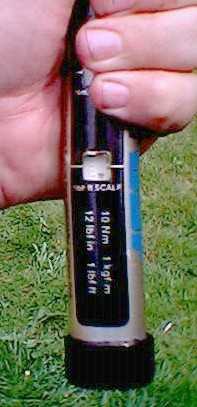 Set
your torque wrench to between 13½ and 18 foot pounds (2 - 2.5 kg/m).
Here I have set mine (left) to 16 ft lbs.
Set
your torque wrench to between 13½ and 18 foot pounds (2 - 2.5 kg/m).
Here I have set mine (left) to 16 ft lbs.
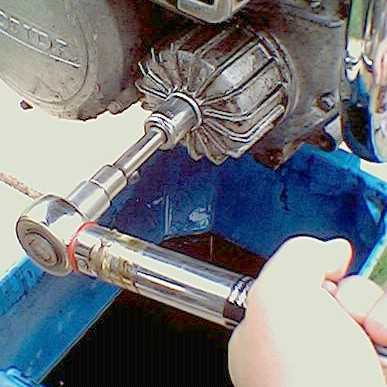 Offer
up the oil filter assembly to its corresponding thread in the crankcase and
turn it by hand as far as you can, at least enough to start the thread. Then
use your torque wrench and socket spanner to tighten the bolt to the correct
tension of 14 - 18 ft lbs (right).
Offer
up the oil filter assembly to its corresponding thread in the crankcase and
turn it by hand as far as you can, at least enough to start the thread. Then
use your torque wrench and socket spanner to tighten the bolt to the correct
tension of 14 - 18 ft lbs (right).
DO NOT DO THIS "BY FEEL" as you may strip the thread or crack the front crankcase. Either of these problems means an expensive, time consuming repair.
ALWAYS USE A TORQUE WRENCH!
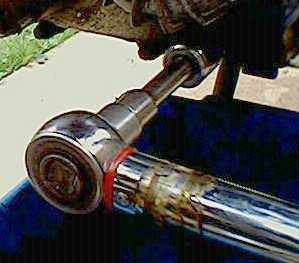 Then
fit the drain bolt by hand to get it started before using your torque wrench
again to tighten it correctly, also to 14 - 18 ft lbs (left).
Then
fit the drain bolt by hand to get it started before using your torque wrench
again to tighten it correctly, also to 14 - 18 ft lbs (left).
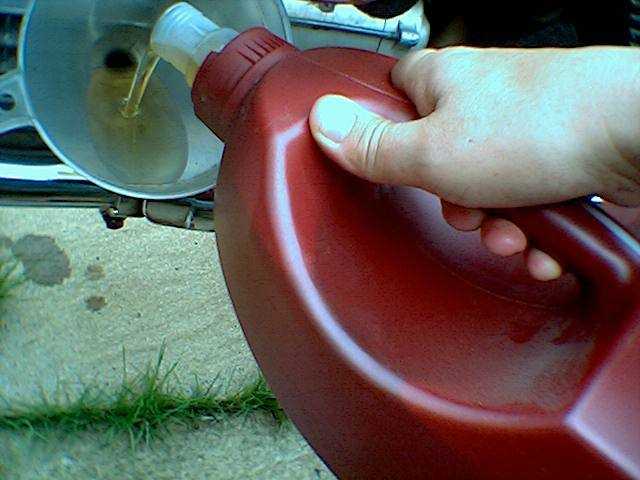 Fill
up the sump (right) with the specified amount of engine oil. Replace
the dipstick and start the engine in the usual way. The oil pressure (red) warning
light should go out almost immediately, certainly after no more than 5 seconds.
Fill
up the sump (right) with the specified amount of engine oil. Replace
the dipstick and start the engine in the usual way. The oil pressure (red) warning
light should go out almost immediately, certainly after no more than 5 seconds.
 Let
the engine idle gently for 30 seconds and then stop it. Now check the oil level;
remove the dipstick (left), wipe it clean and reinsert it without
screwing it in. The correct level is in the hatched criss-cross area, between
the maximum and minimum low marks. You will almost certainly have to top it
up, as the short engine run will have pumped oil around the drained oilways
and passages inside the engine.
Let
the engine idle gently for 30 seconds and then stop it. Now check the oil level;
remove the dipstick (left), wipe it clean and reinsert it without
screwing it in. The correct level is in the hatched criss-cross area, between
the maximum and minimum low marks. You will almost certainly have to top it
up, as the short engine run will have pumped oil around the drained oilways
and passages inside the engine.
Then run the engine again and check / top up the oil level as necessary. Check for leaks at the drain bolt and oil filter bolt. Short road test, check for oil level and leaks again, and you're done. Dispose of the old oil in an environmentally friendly way; most Council tips have engine oil tanks into which your old oil can be deposited. (Mixed 50/50 with creosote, it makes a good weatherproofing compound for wooden sheds and fences!)
You are welcome to comment on these pages.