The Fountain
Of Wisdom
CX500, GL500, CX650, GL650
Owners'
Tips and Tricks
This page is meant
as a general repository for all hints, tips'n'tricks and general information
which owners have found out - usually the hard way. It's divided up into sections
as per the Haynes Manual. At the moment all the contributions are on one page,
but as the sections grow, I will split them into individual pages.
Please feel free to
email me with
your own contribution, which will be credited to you.
ENGINE,
CLUTCH and GEARBOX
"If you're having difficulties
selecting neutral, try going into neutral a split second before you
actually stop. Rotation of the final drive / shaft etc. seems to make it a lot
easier to find!" Nick Eastop, UK, 24-Apr-2003 Also
adjust / renovate the clutch.
"To make it easy to see
the oil level on your dipstick, take it out, wash and clean it. Paint
the "measurement" area with silver model paint. Let it dry completely.
Makes it very easy to see the oil level. I've never had any paint flake off
in 4 years of daily riding." Wayne Cornell, Glendora, California
USA. 4-Aug-2003
"Always prime the lube
system before reinstalling the motor after any engine work. To achieve
this, remove the plugs and engage the starter motor; spin up until oil pressure
is achieved (oil light goes out) or oil makes its way out of the rocker arms.
20-30 seconds on the button should do it. If you can't get sufficient pressure
find out what's wrong, before continuing." Andy Green, UK. 12-Oct-2004
"Here is some info for anyone
trying to determine the big-end shell bearing size for the 650 engine.
The crankshaft has 2 letters stamped onto the balance weights; the letter closest
to the con rod relates to the diameter of the crankshaft big end bearing (the
other letter relates to the diameter of the crankshaft main bearing). The letter
will be either A, B or C. On the machined surface of the big end/end cap, is
a number – 1, 2 or 3. These numbers relate to the diameter of the big end
eye of the con rod. The combinations of these numbers and letters are arranged
in a table to give a colour code for each combination." Andrew Parry,
UK, 18-Apr-2006
"If you can't find a genuine
long shank CX sparking plug spanner with the rubber insert, squirt some
silicon sealer into the end of an ordinary plug spanner and then wrap a sparking
plug in cling film and stuff it in, then leave it for a couple of days to dry
out and form a perfect shape." Reg Worth, Bristol, 05-Aug-06
COOLING
SYSTEM
"When changing hoses,
take the old parts to your local auto parts dealer - he can supply them for
much less than your Honda motorcycle dealer. The thermostat is the same one
used in late '70s Honda Civics and the radiator cap is a standard automotive
13psi." Sidecar Bob,
Canada. 9-May-2003
"An erratic or misbehaving
temperature gauge is often caused not by a cooling fault but by the
bike's battery being below par. Charge or replace your battery and see if the
problem goes away, before attacking the radiator, thermostat or cooling system."
Colin, Stotfold Rally 2003
"When replacing
the mechanical seal with either the Honda or Yamaha one, beware
because there are two different sizes of aperture (normally 28mm) in the rear
crankcase cover. The smaller one (27mm) is no more that 1mm difference in diameter,
but it makes the genuine or the Yamaha replacement seal impossible to fit."
Ian, Alvechurch UK, 31-May-2003
"If you are buying antifreeze
from Halfords, their own label comes in two types. It is the "Advanced"
type you need, this states on the rear of the bottle that it's silicate-free.
It has a distinctive yellow-orange colour quite unlike the normal blue antifreeze.
Mix it 50/50 with distilled (battery top up) water." Author
"If your temperature gauge
tells you the bike is overheating, before taking the cooling system
apart, check the output on the voltage regulator. Take the headlamp unit out
and you'll see it's a yellow wire with an eyelet fastened to the long stud at
the back of the gauge ... OR ... the sender wire (Green/Blue) runs between the
carbs and heads and has a connector that can be opened and the voltage checked
there with the ignition on. I've done it in situ, but you may want to lift the
tank for easier access. This should read 7V or very close to that. I've seen
a few give out about 10V which overdrives the gauge. This isn't apparent until
the engine starts to warm up. Then the needle creeps all the way over to hot."
Reg Worth, Bristol UK, March 2006 Also check that the thermostat
bracket is earthed, as a powdercoated bracket will insulate it from the frame!
[Author]
FUEL
SYSTEM and LUBRICATION
"If your
bike is refusing to start, remove the air filter and spray some WD40
directly into the air intake of the carbs. As the WD has a greater 'octane'
than petrol and is already vapourised, it ignites much more readily than petrol.
It also has the added benefit of cleaning out gunge from the carbs and done
regularly can contribute to cleaner carb internals. Redex only affects the petrol
side of the carbs and doesn't touch the air side of things. Spraying WD40 into
the carbs when the bike refuses to start also aids the spark plugs to do their
job by cleaning deposits from them, as well as repelling any water that may
have accumalated. Of course its no substitute for cleaning your plugs, but helps
the starting process." Gary Claus, Waterlooville, UK. 5-Apr-03
"If you
have a vacuum operated fuel tap - and it works correctly, and the bike
has been standing for at least a week, the following trick can help you starting
it. Loosen the 2 carburettor drain screws to get rid of the old petrol from
the carburettor bowls, then tighten the screws. Detach the inlet manifold side
of the vacuum pipe, and apply some negative pressure by sucking on the tube
end for a couple of times - with a syringe or your mouth. This mimics the running
of the engine, to fill the carburettor bowls with fresh petrol. Re-attach the
vacuum tube to the inlet manifold, and start your engine. My 500EC after sitting
for months starts always in 2 seconds on both cylinders using this technique."
Krisztian Kaldi, Hungary. 14-Apr-2003
"To repair
a hole in the fuel tank, buy some JB WELD at £4 a pack from Halfords.
I used it on my tank and never had a sniff of petrol out since. Just clean up
the area you are applying it to, add copious amounts, and bingo. Once it's set
you can forget about it. I
had a tiny hole in the tank, I actually enlaged the hole slightly to about 2-3mm
in dia. This cleared off the really corroded metal and also made the hole larger.
Making it slightly larger allowed me to put some JB Weld in a 50ml syringe and
then inject it slowly through into the tank. This allows you to get a seal from
both sides, inside and out. Position the tank so that the leaking area is the
lowest point so that the weld sets in place and does not run off inside the
tank." Fiona, Leeds UK, 23-Apr-2003
 "If
you have cracked rubbers on your inlet tracts, get a section of an old
bicycle inner tube and persuade it to go over the black part of the tracts,
then trim off the excess. This is almost completely undetectable and works perfectly
at sealing any of the thin cracks that seem to develop." Maurice
McAllan, UK, Jan 2004.
"If
you have cracked rubbers on your inlet tracts, get a section of an old
bicycle inner tube and persuade it to go over the black part of the tracts,
then trim off the excess. This is almost completely undetectable and works perfectly
at sealing any of the thin cracks that seem to develop." Maurice
McAllan, UK, Jan 2004.
Skippy adds "We
all know that the rubber on the inlet manifolds perishes after while; new ones
are an arm and a leg - if you can get them. They can be very easily repaired
by searching on ebay for a seller who stocks 'Shrink Wrap Tube', I got a whole
load for a couple of quid including P&P, ranging in size from 4mm to 120mm.
I did a couple of test strips to find the optimum diameter and then went for
it. A strip 1 inch wide dropped over the rubber and then warmed with a heat
gun will seal them, giving years more life. Shrink wrap has the added advantage
of being fuel and vapour proof so it won't fail later on like inner tube stuck
with evostik etc."
To replace perished or damaged
rubber seals at the base of he carb bodies, use the end-stoppers from
"Bic"-type ballpoint pens as these will do the job. They are polyethylene,
unaffected by petrol and additives, press into place, and "grippy"
enough not to drop out. Colin, May 2005
IGNITION
SYSTEM
"Buy your spark plugs
from a back street lawn-mower shop as they are not trying to rip us
off (£3 for a set of plugs for my 650) and they can do you replacement
copper cored H.T. lead by the foot and also make up replacement cables for you."
Rick Hoad, Derby UK, 24-Apr-2003
EXHAUST
SYSTEM
"I use bathroom sealer
as exhaust paste, it helps to get every thing to line up and when it
burns off it seals the exhaust (told to me by a friend of mine who goes drag
racing)" Rick Hoad, Derby UK, 24-Apr-2003
"To repair holes in a
leaky exhaust system, use GRIPFILL. It is easily obtainable from builders'
merchants, and at around £3.00 per tube is much cheaper than a specific
exhaust repair product. Also, it fits a standard caulk gun. However, don't use
it to seal junctions on your pipes if you ever want to get them undone again!
As it is a solvent based product, the heat from the exhaust dries it out and
it sets like concrete. I have used it on car exhausts and it has out lasted
the life of the car!" Gary
Claus, Waterlooville, UK. 16-May-2003
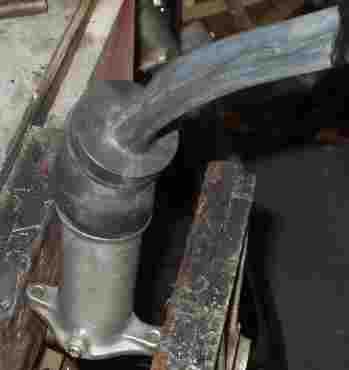
HOW TO MAKE YOUR OWN "ASBESTOS
SEALS". These are the circular shiny seals which fit over the throats
of the downpipes and silencers, where they meet and go into the H-box. The Honda
ones are about a fiver each and they tend to go crumbly, or just get rumpled
up and disintegrate. Then you get exhaust stains over the chrome clamps as well
as popping on the over-run. To find a leaking asbestos seal, wrap an old towel
tightly around each joint in turn, whilst running the engine. When the engine
note changes, that's where your leak is. A leak here sounds almost exactly like
tappet rattle. Take a yard of bog standard kitchen cooking foil and fold it
into a bandage-like strip 3/4 of an inch wide. Clean up the downpipe or silencer
throat, and wrap the foil bandage tightly around it. Finally wrap one thickness
of Halford's (or whoever's) exhaust repair material over the whole thing.
I've also used, instead of aluminium
kitchen foil, the very thick silver trays in which takeaway meals are often
delivered. These are excellent for the purpose of making h-box seals. I've even
used them to completely cover the very rusted exhaust header pipe and waste
gate heat shields on my 500 Turbo. WIth a flap of an extra inch of metal all
round the original shape, and then bent over and crimped, they are still play
a year afterwards with so signs of heat damage.
If it's a silencer, there is a water
drain hole in the underside of the silencer body, make sure this hole is not
obstructed, you may have to poke a slim screwdriver through the home-made seal.
The exhaust repair stuff is a roll of what looks like very thick silver sellotape,
on a roll. You peel off a length, strip off the sticky back and stick it on
whatever you like. When you've attached the home-made seal, you'll find that
it's a trifle thicker than the Honda asbestos seal and you may have to gently
ease apart the four flaps at the rear or the H-box, and wriggle in the silencer
throat, don't forget to fit the chrome clamp ring first, or you'll have to unscrew
it to get it on! The downpipes generally fit straight in, as the H-box here
seems a little wider. The home-made seals cost pence to make and they don't
crumble. If they get damaged, just unpeel them and make a new one. (Author,
30-Dec-2003)
FRAME,
FORKS and HANDLING
"Whilst trying to cure
some vagueness in the bike's handling, I slid my bum about two inches
further back along the saddle, which lowered my head by about an inch. I noticed
that the "tracking" feeling had almost completely vanished! Previously
I had been riding with my crotch just about as far forward on the saddle as
it was possible to get and I'd been wondering why Honda had made the knee indents
in the tank too short. My predjudiced assumption of the character of the bike
had made me adopt an upright riding position, not thinking that it might actually
have been designed with a more sporty attitude. I'm surprised by the way, that
such a small difference in weight distribution can have such a big effect, maybe
the fact that I'm leaning more heavily on the steering contributes? If your
bike has some strange directional uncertainty, try varying your riding position."
Nick Eastop, UK
"To balance your own wheel
after fitting a new tyre, make sure the tyre is on correctly - there
is usually a spot of paint on the sidewall of a new tyre - this marks the lightest
point of the tyre, so this spot should be next to the valve. Remove any old
weights. Put the axle back in the wheel and support it at each end of the axle,
so the wheel can turn freely. Spin the wheel and chalk-mark the lowest point
after it's stopped. Do it a few times, marking the lowest point each time. If
the wheel is balanced, these marks will be all over the place, if it's not they'll
be concentrated on one side, this is the heavy point. All you need to do is
add weight to the opposite side to match, we're only talking a few grams. One
indicator of how much weight is the density of chalk marks - the closer they
are together the greater the weight difference is likely to be. Add weight,
remove old chalk & spin that wheel again until the marks are all random
- job done.
"On my old spoked wheel bikes
I used solder wrapped around the rim end of the spoke with a light touch of
the soldering iron to secure it once balanced. With Comstars you're better off
getting hold of the stick-on weights they use in Kwik-fit and the like - I've
sweet-talked a handful out of the guys when in getting my car tyres done - it's
even easier sending the wife in with a button or two missing from her blouse!"
Pete W, August 2005
"For rechroming,
try Cradley Plating Co, Woods Lane, Cradley Heath, Warley, West Mids. Email
[email protected]. Tel 01384634111
and Fax 01384413110. I've seen their work and it's immaculate." Richard
Todd, Telford UK, 29-Oct-2003.
"If your forks are pitted
or damaged, seals leaking etc, I had good service from Pitted
Forks. Their price includes collection, rechroming, new seals and oil,
and redelivery." - Aircoolednut, UK, 9-Jul-2003
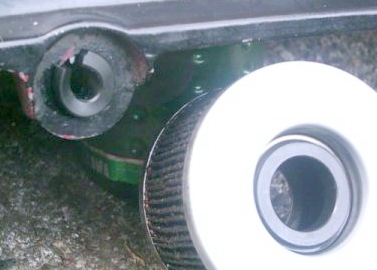 To
replace the shaped rubber grommets which hold on the side panels, take
an old oil filter and prize out one of the old rubber grommets / sealing rings.
De- grease and dry it and then cut it in two. Each half can be inserted / bent
into a Side Panel hole (left). Glue with Bostick or Superglue for a nice little
job. Shep, Hull UK, August 2004.
To
replace the shaped rubber grommets which hold on the side panels, take
an old oil filter and prize out one of the old rubber grommets / sealing rings.
De- grease and dry it and then cut it in two. Each half can be inserted / bent
into a Side Panel hole (left). Glue with Bostick or Superglue for a nice little
job. Shep, Hull UK, August 2004.
"To repair a mounting
stud or any part of your plastics, I repaired mine with a GREAT product
called PLASTEX. A while back, I
took the sidecovers off to clean & check the battery and air cleaner. I
noticed there was a crack starting on one of the rear support pegs. I've read
where this is a common problem with the sidecover pegs. Luckily mine was not
cracked all the way. I've had my cover off a number of times to check it, and
it is perfect. Many, many miles on it also. Product is easy to use & apply,
and holds like it was welded, I highly recommend it for anything made with ABS
material." Wayne, 16-Nov-2003
"To ft that tough mainstand
or sidestand spring, clamp one end in a vice, or hold it fast with a
Mole wrench. Now bend the spring hard over and slide a series of slim washers
between the opened coils. Reverse the bend and do the same on the opposite silde
of the coils. This lengthens the spring by as much as 1" and makes fitting
it over the stand and frame lugs very easy. As soon as the stand is extended,
the washers usually just fall out, if they don't, just pull them with pliers."
Howard Bell, Telford, July 2004. (Author's note : this technique
is brilliant and works extremely well!)
Handlebar shake at low speeds
is caused by worn headstock bearings. Remove and replace with tapered roller
bearings. Author, August 2005
WHEELS,
BRAKES and TYRES
"Bearing
stockists are good for your front and rear wheel bearings (don't tell
them what it's for, but take the old one with you for them to measure) got the
fronts for the trike for £5 the pair!" Rick Hoad, Derby UK,
24-Apr-2003
"Friction Hydraulic Services
of St George's, Telford (01952 615793) made me up a set of 4 made-to-measure
stainlees steel brajke hoses for my 500 Turbo, and with two hydralic brake light
switches, charged me only £70. They also supply o-rings and suchlike."
Author, 10-Mar-2007
ELECTRICAL
SYSTEM
"A blown
main 20-amp fuse stops all your electrics - indicators, lights - as
well as the starter motor - from working. Your engine will continue to run,
so if you have to switch off the engine, stop at the top of a slope so you can
bump-start the bike. If you can't obtain a 20-amp fuse, and you are sure
you don't have a short circuit which might cause a fire, wrap silver paper round
the fuse and replace it in the connector by the battery. Another dodge is to
use a piece of domestic 30-amp fuse wire - but this is strictly a get-you-home
solution, as a 30-amp fuse will not blow if a serious electrical fault develops.
A 15-amp with a 5-amp piece is better. Always carry spare main and secondary
fuses in your travellling toolkit." - Author
"Trailer shops are good
for bulbs (not head light), cable ties, and electrical connectors."
Rick Hoad, Derby UK, 24-Apr-2003
"If you have a blowing
main fuse, and the wiring around that area is hot - but you can't find
a short circuit - change the starting solenoid. I learned that these things
tend to corrode and can get 'sticky' when they get old. If this happens, it
keeps drawing amps. And this caused the wiring and fuse holder to heat up."
Floris Bongearts, Holland,
18-Aug-2003.
"If your indicators don't
flash, or flash at the wrong speed / erratically, check that working
21 watt bulbs are fitted in the bulb holders, as lower wattage bulbs don't draw
enough current to make the flasher unit work. Also check that it's the correct
flasher unit. Some aftermarket ones have a third (earth) connection, but the
CX/GL ones don't need this." Author, August 11th 2005
MISCELLANEOUS
"A really convenient place
to keep a rag or cloth is stuffed in behind the rear right engine casing,
directly over the shaft drive housing and next to the coolant overflow bottle.
It's great for when you need to wipe your dipstick, clear up minor spills or
drips, or as a hand-warmer when you stop!" - Author
"To clean dead and squashed
flies off your visor, soak a panel of kitchen roll in tapwater and press
it over the closed visor. 10 minutes later, the squashed insects will come away
with a gentle wipe, without any scratching." - Author
"Wipe the inside of a
visor on a crash helmet with some washing up liquid on a piece of tissue.
Then wipe off with another clean tissue, not water. Anti-mist film is left against
breath in the cold weather." Shep, UK, October 2004