 Turn
off the fuel supply and disconnect the fuel pipe from the petrol tank (right)
to the LH carburettor. My bike has a manual fuel tap with only one pipe, but
variants with a vacuum operated tap will have two pipes.
Turn
off the fuel supply and disconnect the fuel pipe from the petrol tank (right)
to the LH carburettor. My bike has a manual fuel tap with only one pipe, but
variants with a vacuum operated tap will have two pipes.CX500 / GL500 / CX650 / GL650 Carburettor Remove / Refit
Skill Level : 2. Dirty Level : 1. Work Mess Level : 1. Tools level : 1 : 8mm, 12mm, 14mm, 17mm ring and socket spanners; T-handled screwdriver; WD40; ratchet and extension bar; torque wrench. Space required : 1
Time : expert 15 minutes, average 20 minutes, "first-time" 30 minutes.
All the hands, tools, and bike in the photos are the author's. In some of the photos I have had to wipe my hands clean before using the camera.
All nuts and bolts are described in the spanner size required to fit them.
This page will show you how to remove and refit the carburettors on your CX500, GL500, CX650 or GL650. Typically this is part of the engine removal process, to fit exchange carburettors, or remove them for examination and servicing.
All bolt sizes are quoted as the spanner size required to fit them.
I am very receptive to comments and suggestions, but you use these pages entirely at your own risk.
Removal Procedure
Place the bike on its centre stand on a firm surface and turn off the ignition. As you will be dealing with petrol, don't smoke or use any naked flame during this procedure. Either drain the carburettors by undoing the small drain screws at the bottom of each one, or run the engine with the fuel turned off, until the engine stops. Then allow the engine to cool down.
Turn
off the fuel supply and disconnect the fuel pipe from the petrol tank (right)
to the LH carburettor. My bike has a manual fuel tap with only one pipe, but
variants with a vacuum operated tap will have two pipes.
Remove the saddle. My bike has two spring loaded catches at each underside of the rearmost part of the saddle; other models may be different, and require the saddle to be unbolted.
Remove the 12mm head bolt securing the petrol tank (right), and lift off the tank. Some variants have the tank bolted at two points right at the front. Place the tank outside and away from any potential source of heat, flame or electrical spark. Particularly, if you are working in a shed or garage, do not place it at your only means of exit. If there is a fire, you won't be able to escape. I have scars to prove it.
Whenever you remove the tank, swish the fuel round to stop any muck accumulating in the bottom section.
 Remove
both the side panels. These pull off from the bottom, and then lift upwards.
Upturned, they make a good place to keep nuts and bolts, so you don't lose any.
Remove
both the side panels. These pull off from the bottom, and then lift upwards.
Upturned, they make a good place to keep nuts and bolts, so you don't lose any.
 Fully
slacken (there is no need to remove) all four circlips from the carburettors.
These are located, on each carburettor, where the soft rubber hose from the
airbox joins the rear of the carb (right), and at the front of the carb
where it joins the inlet tract.
Fully
slacken (there is no need to remove) all four circlips from the carburettors.
These are located, on each carburettor, where the soft rubber hose from the
airbox joins the rear of the carb (right), and at the front of the carb
where it joins the inlet tract.
The 500 Eurosport amd all the 650s have the carbs mounted more centrally than the ZABC type shown here, but the removal tecnique is the same.
On my bike I have replaced the slender Honda black circlips with ordinary wider Jubilee type clamps, bought from Halfords.
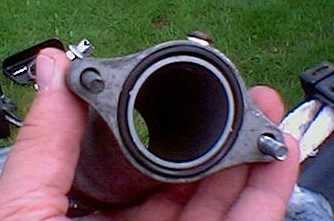
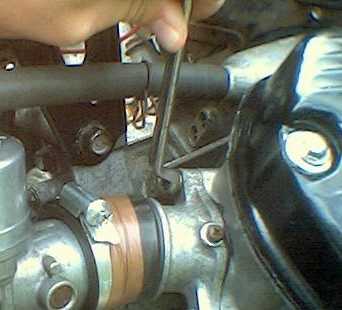 Remove
the two 8mm bolts which secure the inlet tract to the right hand side cylinder
head (left) The easy way to remove the tract is to loosen the circlips
at the carburettor end, and then gently rotate the tract around the carb so
that the alloy end moves away from the inlet manifold.
Remove
the two 8mm bolts which secure the inlet tract to the right hand side cylinder
head (left) The easy way to remove the tract is to loosen the circlips
at the carburettor end, and then gently rotate the tract around the carb so
that the alloy end moves away from the inlet manifold.
The off-set angle of the inlet tract means that as the tract rotates, the gap between tract and inlet manifold increases, and leaves much more space to ease the rubber end off the carburettor stub. Don't lose the black rubber O ring which seals between the tract and the head.
Repeat, removing the left hand inlet tract.
(Notice the brown insulating tape I used to try and track down an elusive carburettor fault. It did not help, so I removed this tape during the work session.)
If your bike has the thick black soft rubber engine breather pipe connected at the cylinder head (left), pull off the holding circlip and the pipe, and fold it out of the way.
 Store
the two inlet tracts, the four bolts and 2 O rings (right) safely. If
the O rings show any signs of damage, replace them.
Store
the two inlet tracts, the four bolts and 2 O rings (right) safely. If
the O rings show any signs of damage, replace them.
For cosmetic purposes, it's a good idea to give the outsides of these inlet tracts a good scrub and clean whilst you have them removed from the engine.
Also examine the hard rubber part of the tracts for cracks or damage. A temporary repair can be effected by wrapping with black insulating tape, but really the part should be replaced if there is any damage.
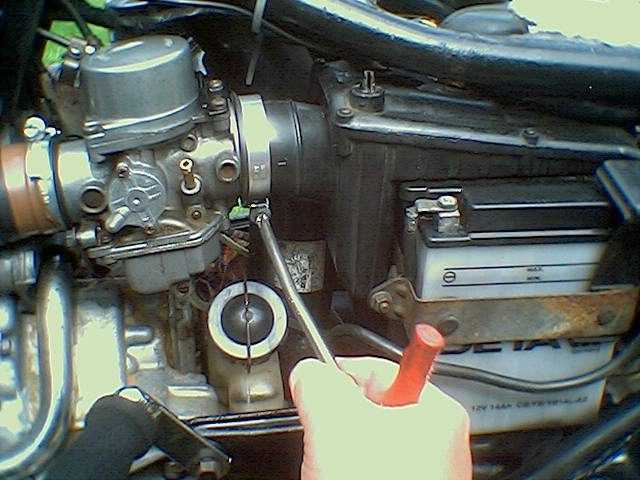
 Slacken
off the locknut for the choke cable (left) ...
Slacken
off the locknut for the choke cable (left) ...
 ...
and slip the metal collar end of the cable out of the clamp (right).
...
and slip the metal collar end of the cable out of the clamp (right).
Then reach around the back of the carbs to where the extreme end of the choke cable joins the mechanism, and slide the barrel-shaped nipple out of its shaped recess. Lift the cable clear of the working area.
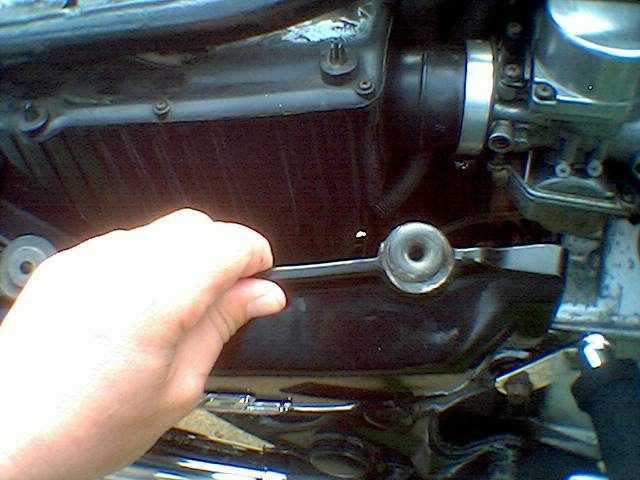
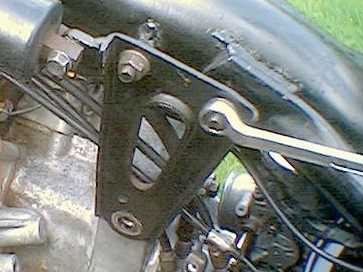
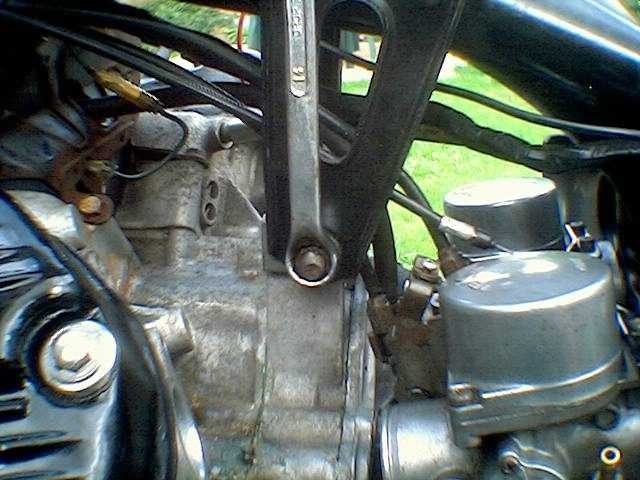 For
the ZABC models, slacken the large 14mm nut at the bottom the V-shaped engine
mounting plate (left). This is located directly above and forward of
the carburettors.
For
the ZABC models, slacken the large 14mm nut at the bottom the V-shaped engine
mounting plate (left). This is located directly above and forward of
the carburettors.
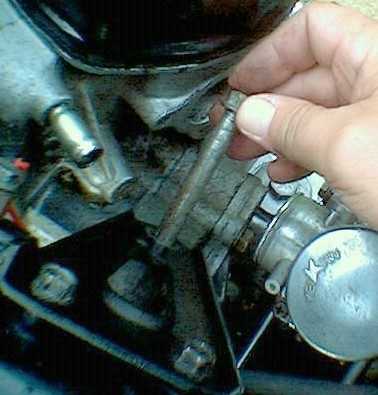 You
will probably need a spanner at each end of it, but remove the long bolt (right).
You
will probably need a spanner at each end of it, but remove the long bolt (right).
Eurosport 500s and all 650s don't have this mounting bracket and bolts.
 Slacken
and remove the top two 12mm holding nuts for the V-shaped plate (right).
Slacken
and remove the top two 12mm holding nuts for the V-shaped plate (right).
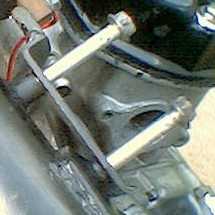 If
the bolts are pushed in from the right hand side, there is no need to remove
them - just push them clear of the left hand plate, freeing it. If the bolts
haven't been removed before, it's a good idea to take them right out, then clean
and grease them.
If
the bolts are pushed in from the right hand side, there is no need to remove
them - just push them clear of the left hand plate, freeing it. If the bolts
haven't been removed before, it's a good idea to take them right out, then clean
and grease them.
If the bolts are inserted from the left, remove them completely. Clean and grease them and replace them from the right hand side, leaving the left hand V plate free to move.
Store the nuts safely.
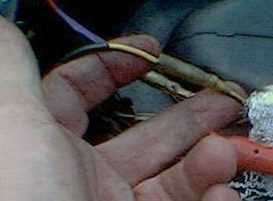
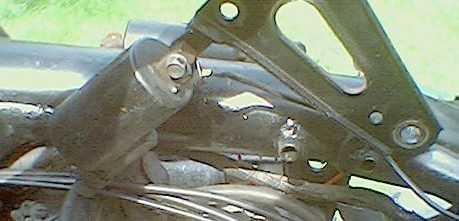 Trace
the thin yellow electrical lead from the left hand ignition coil (the large
black barrel-shaped device) backwards to where it plugs into a bullet connector
under the saddle, and disconnect it. Pivot the left hand V plate on its frontmost
bolt, and lift the ignition coil and V plate upwards (left) to clear
the working area.
Trace
the thin yellow electrical lead from the left hand ignition coil (the large
black barrel-shaped device) backwards to where it plugs into a bullet connector
under the saddle, and disconnect it. Pivot the left hand V plate on its frontmost
bolt, and lift the ignition coil and V plate upwards (left) to clear
the working area.
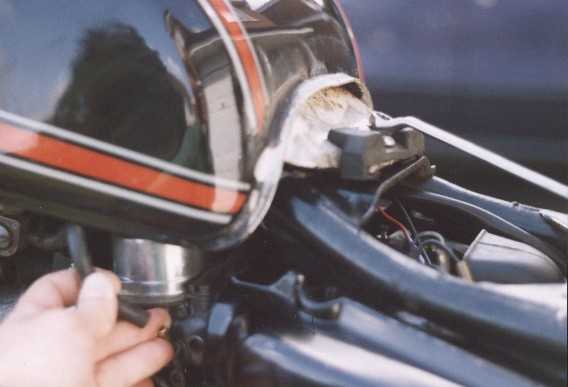
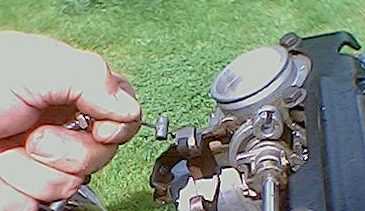
 The
carburettors are still attached (right) to the throttle cables, and pull
out towards the left. They are a tight fit between the engine and the rear part
of the main spar and you will probably have to work them around the main electrical
harness.
The
carburettors are still attached (right) to the throttle cables, and pull
out towards the left. They are a tight fit between the engine and the rear part
of the main spar and you will probably have to work them around the main electrical
harness.
Note that some petrol will almost certainly leak out at this point. Be careful of fire.
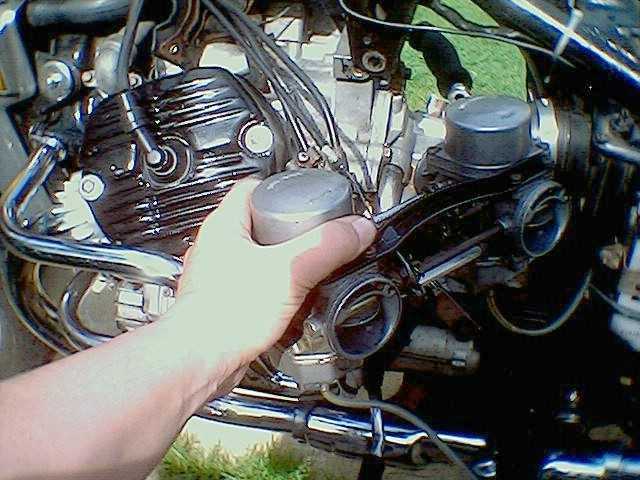
 A
good place to position to the carbs whilst you disconnect the throttle cables
is on top of the main spar, just forward of where the petrol tank holding bolt
screws in.
A
good place to position to the carbs whilst you disconnect the throttle cables
is on top of the main spar, just forward of where the petrol tank holding bolt
screws in.
As you have just disconnected the choke cable, observe the choke butterflies at rest (fully open).
There are some differences in carb models so don't worry if yours don't look exactly like mine.
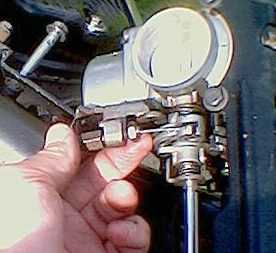
 Slacken
the locknut (left) which secures the rearmost of the two throttle cables
to the carburettor body ...
Slacken
the locknut (left) which secures the rearmost of the two throttle cables
to the carburettor body ...
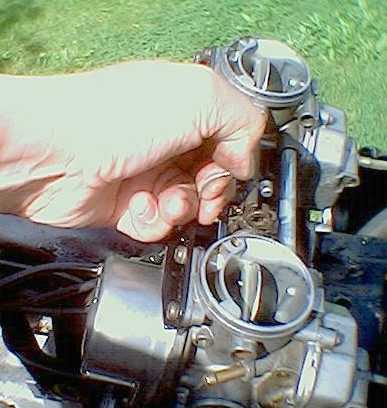 ...
and disconnect the cable from its location (right) on the actuating mechanism.
Mark it "R" for rearmost, or tie a label to it. This will save you
trouble later on.
...
and disconnect the cable from its location (right) on the actuating mechanism.
Mark it "R" for rearmost, or tie a label to it. This will save you
trouble later on.
It is the rearmost cable which opens the throttles. The actuating mechanism is spring loaded to close automatically if the twistgrip is released, but for safety reasons, the throttle also has a close (frontmost) cable.
So if the closing spring fails, you can still throttle back by operating the twistgrip.
 Turn
the carbs over. Slacken the locknuts (left) which hold the other cable
to its bracket, and disconnect the cable from the bracket. Now disconnect the
cable end from actuating mechanism.
Turn
the carbs over. Slacken the locknuts (left) which hold the other cable
to its bracket, and disconnect the cable from the bracket. Now disconnect the
cable end from actuating mechanism.
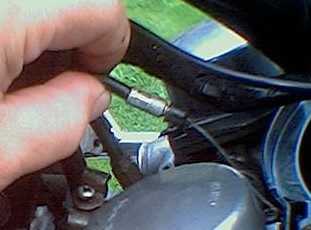
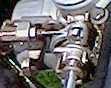
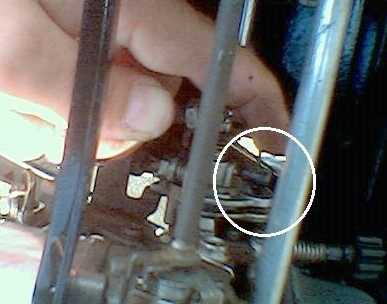 This
one is rather fiddly to get at - on the photo (right), I've circled the
cable nipple end as it has just been removed from the actuating mechanism.
This
one is rather fiddly to get at - on the photo (right), I've circled the
cable nipple end as it has just been removed from the actuating mechanism.
 Once
the frontmost throttle cable is disconnected (left), The carburettors
should now lift completely clear.
Once
the frontmost throttle cable is disconnected (left), The carburettors
should now lift completely clear.
Refitting Procedure
This is a straightforward reversal of the removal. However the following points will prove useful.
When adjusting the throttle cable locknuts, allow 2-3mm free play on the cable. In other words there should be a slight amount of free movement at the twistgrip before anything moves on the carburettor actuating mechanism.
Ensure the twistgrip throttle is completely closed (idle speed position) before reattaching the rearmost cable.
Ensure the twistgrip throttle is completely open (full power position) before reattaching the frontmost cable.
Ensure the choke pull lever is completely closed (normal warm running position ) before reattaching the choke cable. Again allow 2-3 mm free play when retightening the clamp.
Clean and grease all nuts and bolts before reassembly - they'll come out easily next time.
When replacing the carbs, slide the choke ends into the soft rubber hoses from the airbox before fitting the inlet tracts. There is quite a lot of squashy play in the soft hoses which gives you valuable manoeuvring room at the inlet tract end. Get all 4 carburettor ends securely located before you tighten the circlips.
Torque wrench settings for the engine bolts are at the bottom of this linked page.
If you forget to replace the big circlips before reinstalling the carbs, don't worry, you don't need to remove the carbs again. Just fully unscrew the circlips and separate them so that you can slip them over the airbox pipes or the inlet tracts, and then reconnect them again.
After reassembly and refitting, check that the throttle cables operate freely and correctly at the twistgrip, and that the choke cable also works as it should. DON'T FIND THIS OUT ON A ROAD TEST!
If all is in order, give the linkages and between-carbs area a good squirt with light lubrication oil.
 Don't
forget to reconnect the left hand coil ignition lead! It's the yellow one.
Don't
forget to reconnect the left hand coil ignition lead! It's the yellow one.
Additional pictures
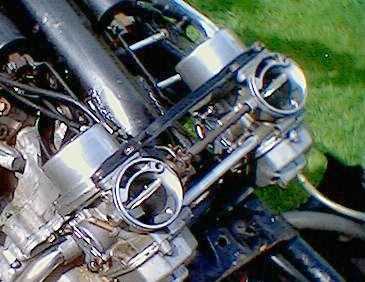
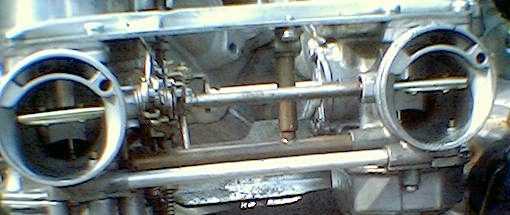 Rear
view of carburettors, with choke butterflies at rest (i.e. open).
Rear
view of carburettors, with choke butterflies at rest (i.e. open).
On this model of carb, the fuel transfer pipe is at the rear. It's the shiny pipe right at the bottom of the assembly.
Some carbs have this pipe at the front.
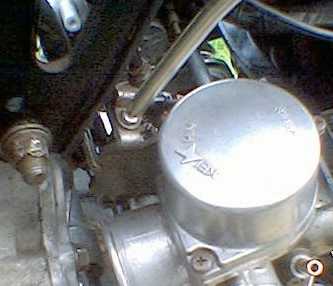
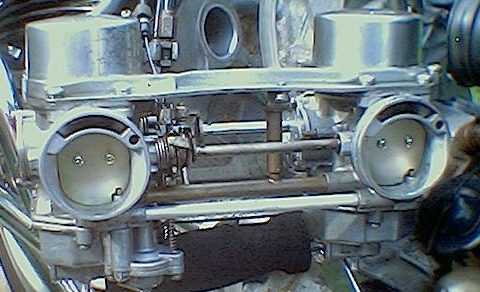 Rear
view of the carbs, with the choke fully closed for a cold start (i.e. the handlebar
choke lever pulled fully out). Note that these carburettors have the accelerator
pump underneath the left hand carb. Not all carbs have this pump, which is designed
to give better acceleration.
Rear
view of the carbs, with the choke fully closed for a cold start (i.e. the handlebar
choke lever pulled fully out). Note that these carburettors have the accelerator
pump underneath the left hand carb. Not all carbs have this pump, which is designed
to give better acceleration.
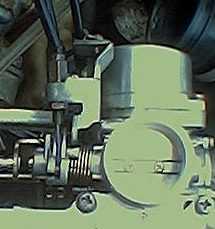 Sorry!
the sun caught this one. Front view of carbs with the twistgrip fully relaxed,
engine at idle speed (left) with the closing cable correctly refitted.
Sorry!
the sun caught this one. Front view of carbs with the twistgrip fully relaxed,
engine at idle speed (left) with the closing cable correctly refitted.
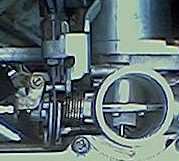 Front
view of carbs (right) at maximum throttle, i.e. butterflies fully open.
Front
view of carbs (right) at maximum throttle, i.e. butterflies fully open.
You are welcome to comment on these pages.