 Skill
Level : 2. Dirty Level : 1. Work Mess Level : 1. Tools
level : 1 : 8mm (plus 12mm, 14mm for Z, A, B, C owners) ring and socket
spanners; T-handled screwdriver; ratchet and extension bar; vacuum gauges. Long
thin screwdriver.
Skill
Level : 2. Dirty Level : 1. Work Mess Level : 1. Tools
level : 1 : 8mm (plus 12mm, 14mm for Z, A, B, C owners) ring and socket
spanners; T-handled screwdriver; ratchet and extension bar; vacuum gauges. Long
thin screwdriver.CX / GL 500 / 650 Carburettors balance
Skill levels explained. This page does not apply to Turbo models.
All nut and bolt sizes are given for the spanner size required to fit them.
Skill
Level : 2. Dirty Level : 1. Work Mess Level : 1. Tools
level : 1 : 8mm (plus 12mm, 14mm for Z, A, B, C owners) ring and socket
spanners; T-handled screwdriver; ratchet and extension bar; vacuum gauges. Long
thin screwdriver.
My vacs are trusty old Davida ones - highly recommended - they are about 35 years old and still work perfectly.
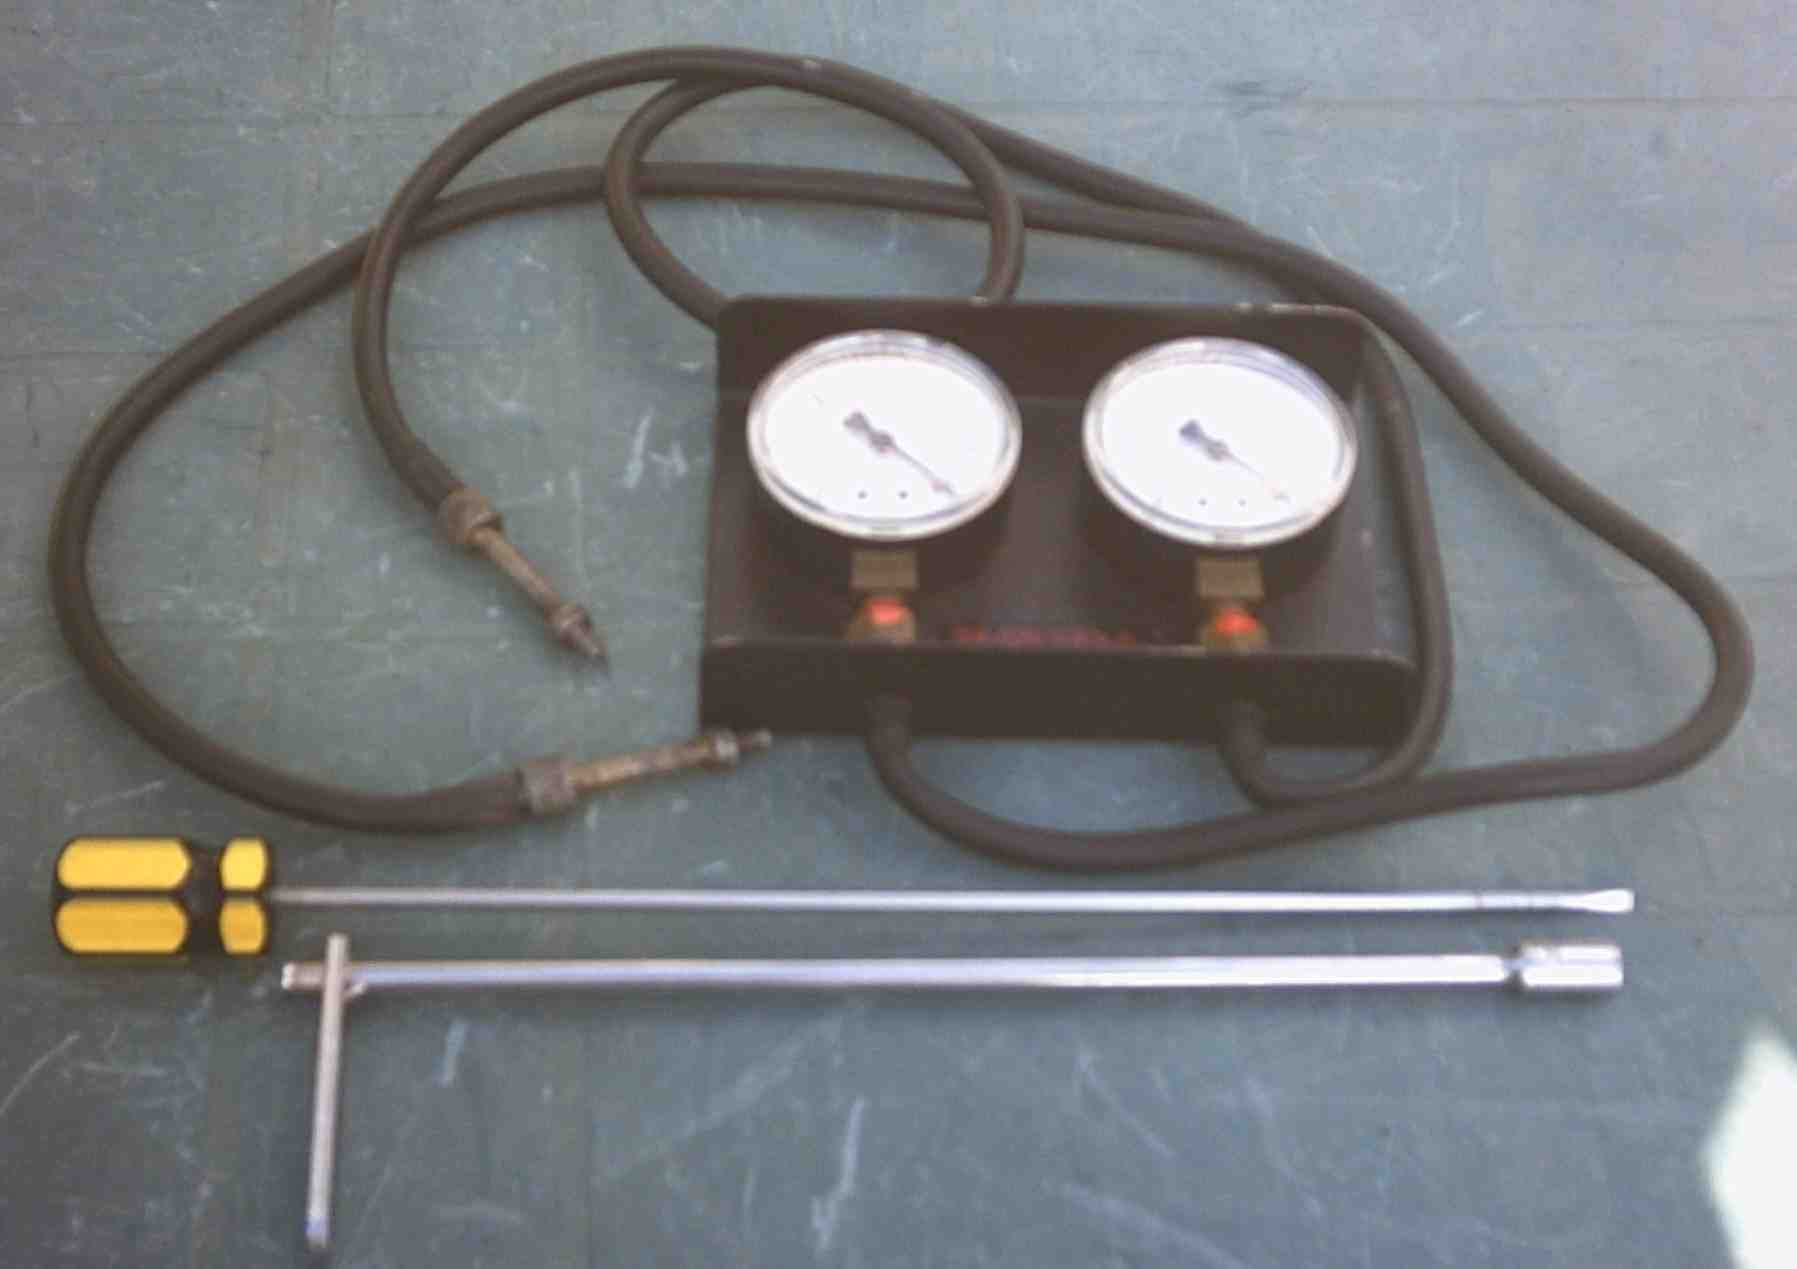
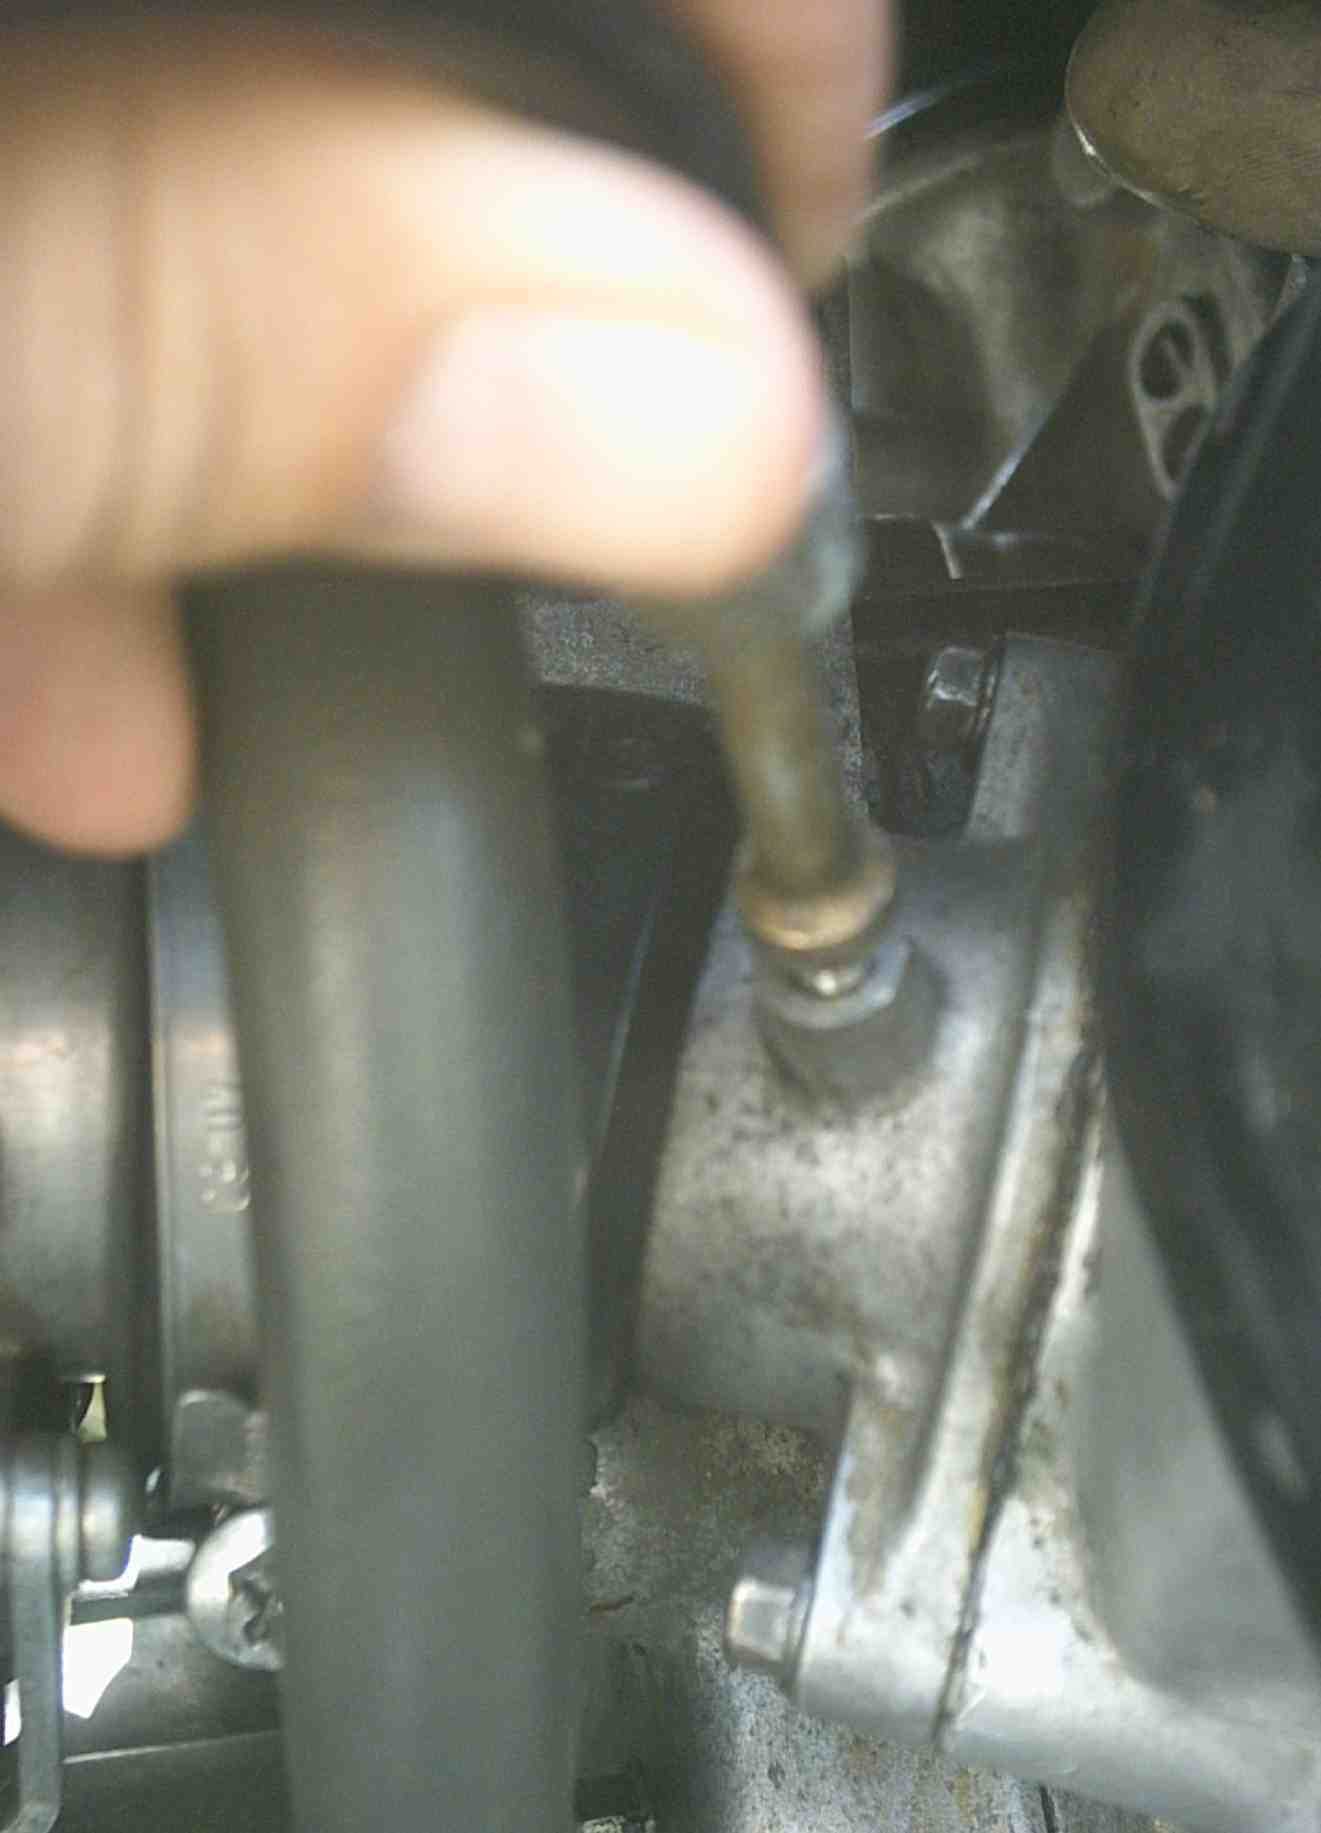
It helps a great deal if the special tool (in the lower part of the picture) is used. This isn't essential, but very much recommended. It consists of an 8mm long-shanked socket spanner which is hollow and allows a long-bladed very thin screwdriver to pass down it.
Space required : 1
Time : expert 20 minutes, average 30 minutes, "first-time" 45 minutes.
All the hands, tools, and bike in the photos are the author's. In some of the photos I have had to wipe my hands clean before using the camera.
This page will show you how to balance the carburettors on your CX or GL. This can be done any time you like.
I am very receptive to comments and suggestions, but you use these pages entirely at your own risk.
What is this procedure and why do I need to do it?
This help page does not apply to Turbo models.
Let's begin by looking at what the carburettors actually do and how they work.
Fuel from the fuel tank drops under gravity down the fuel pipe and then along a short transfer pipe which feeds both carbs. Each carb has a small chamber or reservoir on its underside, which works rather like a toilet cistern. It stores a small amount of fuel ready for use, and as the engine runs and uses up this small reservoir, a float in the chamber drops as the fuel level drops, opening a small valve which allows more fuel back in. As this is used up, the fuel level drops again and opens the valve. This reservoir is called the float chamber or the float bowl.
One common reason for carbs to leak fuel is when this tiny float valve either sticks open, or is jammed open by a small piece of rust or debris.
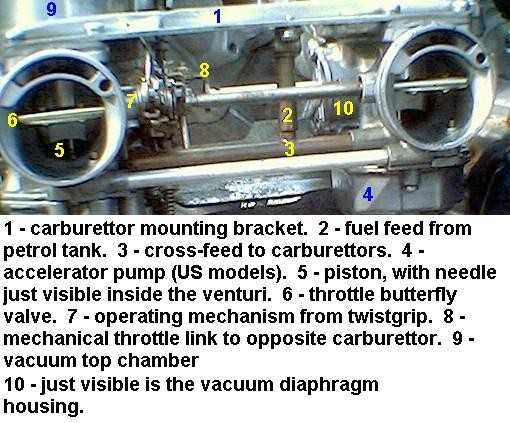
View (left) of the carburettors is from the rear of the engine.
(There is no significance to the different coloured numbers - some yellow ones didn't show up well against the background, so I used blue in some cases.)
As you open the throttle, the cables pull on a spring loaded lever which, on each carb, opens a circular valve, called a butterfly valve, between the carb and the cylinder inlet. This valve is actually a slim circular plate, hinged across the middle, and when closed by the spring, blocks off the passage between the carb and the engine.
As the butterfly valve opens and the engine starts to suck in more fuel, a vacuum develops inside the carburettor body. This space is called the venturi. The vacuum is transferred up small passages inside the carburettor body to the upper part of the carb where the low pressure pulls up against a piston, which is very lightly spring loaded in the opposite direction. As this piston rises up the body of the carb, a long slender and tapered needle attached to its underside is also raised. The bottom end of the tapered needle is inserted into a brass plug with a hole in its centre. This is called the jet and the underside of it is immersed in fuel inside the float chamber. As the tapered needle rises, pulled up with the piston, the jet hole gets bigger.
The vacuum in the venturi sucks up fuel from the float chamber and this fuel passes up the jet aperture and sprays into the venturi. At the rearmost part of the carb is the large intake tract which is attached to the airbox and the air filter inside it. The spraying fuel is vapourised in the rush of incoming air (like an aerosol spray) and sucked past the open butterfly valve into the engine, where it is burned by the sparking plug.
When you close or reduce the throttle, the throttle return spring closes the butterfly valves, shutting off some or all of the fuel/air mixture, the vacuum in the venturi decays, the pistons are pushed back down by their light springs, and the tapered needle is lowered back into the jet, reducing the size of the jet aperture and thus reducing the amount of fuel which the engine can suck in.
Cast into the left side of each carb body is a small device known as an air enrichment valve. This consists of a small chamber with one passageway feeding fuel straight through to the inlet tract. This passageway is normally shut off and blocked by a rubber diaphragm, pushed into the passageway by a coil spring. However, when the throttle is shut off, vacuum in the inlet tract sucks open these diaphragms and allows neat fuel into the engine. This prevents popping and backfiring. These rubber diaphragms tend to either perish, crack, or degrade, especially if the bike is stored for long periods. This is easily fixed by removing the two tiny screws which hold on the covering plate, and replacing the diaphragm, spring, and tiny washer. The screws on the right hand carburettor face inwards and can be just about reached with a long, thin screwdriver.
There is a pair of brass jets facing each other across the divide between the two carburettor bodies. These look as if they should be connected, but in fact they aren't. They are just vents, and if you tip the carbs over they might leak petrol.
Ok so far? You'll see that there are two carburettors doing this, and like a cart with two horses, unless both horses are pulling with equal strength, the cart won't get maximum performance. If the left hand horse pulls harder than the right hand horse, one has an easy time and the other one works too hard. With carbs, they should be working in exact synchronisation, both delivering exactly the same amount of fuel/air mixture at exactly the same time.
Balancing the carbs means testing the amount of work each carb is doing and adjusting them so that they work as a perfect pair.
Symptoms of unsynchronised or unbalanced carburettors
1 Poor or erratic idle speed. A fully warmed CX or GL engine should normally idle at 1,100 rpm and idle quite comfortably and without any hunting (idle speed rising and falling by itself) at 1,000 rpm. A properly balanced warm engine will idle as low as 600 rpm, and how low this will actually go before the engine stalls is a very good test of how well the carbs are balanced. If your engine won't idle cleanly at 900 rpm, then the carbs are out of synchronisation.
2 Poor fuel consumption. Assuming a 500cc with a standard exhaust, anything consistently less than 50 mpg (Imperial gallons, 8 pints) suggests either that you are riding too hard or that the carbs are out of synch.
3 Poor performance. There are several reasons why performance might be down and this is just one of them.
Popping or backfiring, especially on the over-run, is not usually caused by unbalanced carbs; but synchronising them is part of the cure. Details of this cure are at the end of the article.
Procedure
 In
order to see how much work each carb is doing, you need to measure the amount
of vacuum inside each of the inlet tracts, as the degree of "suck"
here is dictated by the carburettor mechanism. This requires a pair of vacuum
gauges (left). These can be an expensive purchase, but a good set will last
you a lifetime.
In
order to see how much work each carb is doing, you need to measure the amount
of vacuum inside each of the inlet tracts, as the degree of "suck"
here is dictated by the carburettor mechanism. This requires a pair of vacuum
gauges (left). These can be an expensive purchase, but a good set will last
you a lifetime.
You cannot balance the carbs without vacuum gauges.
Firstly, warm the engine to the normal operating temperature.
 On
each inlet tract, remove the small screw and washer which closes off the vacuum
ports.
On
each inlet tract, remove the small screw and washer which closes off the vacuum
ports.
 Fit
the adapters into the opened ports and screw them finger-tight.
Fit
the adapters into the opened ports and screw them finger-tight.
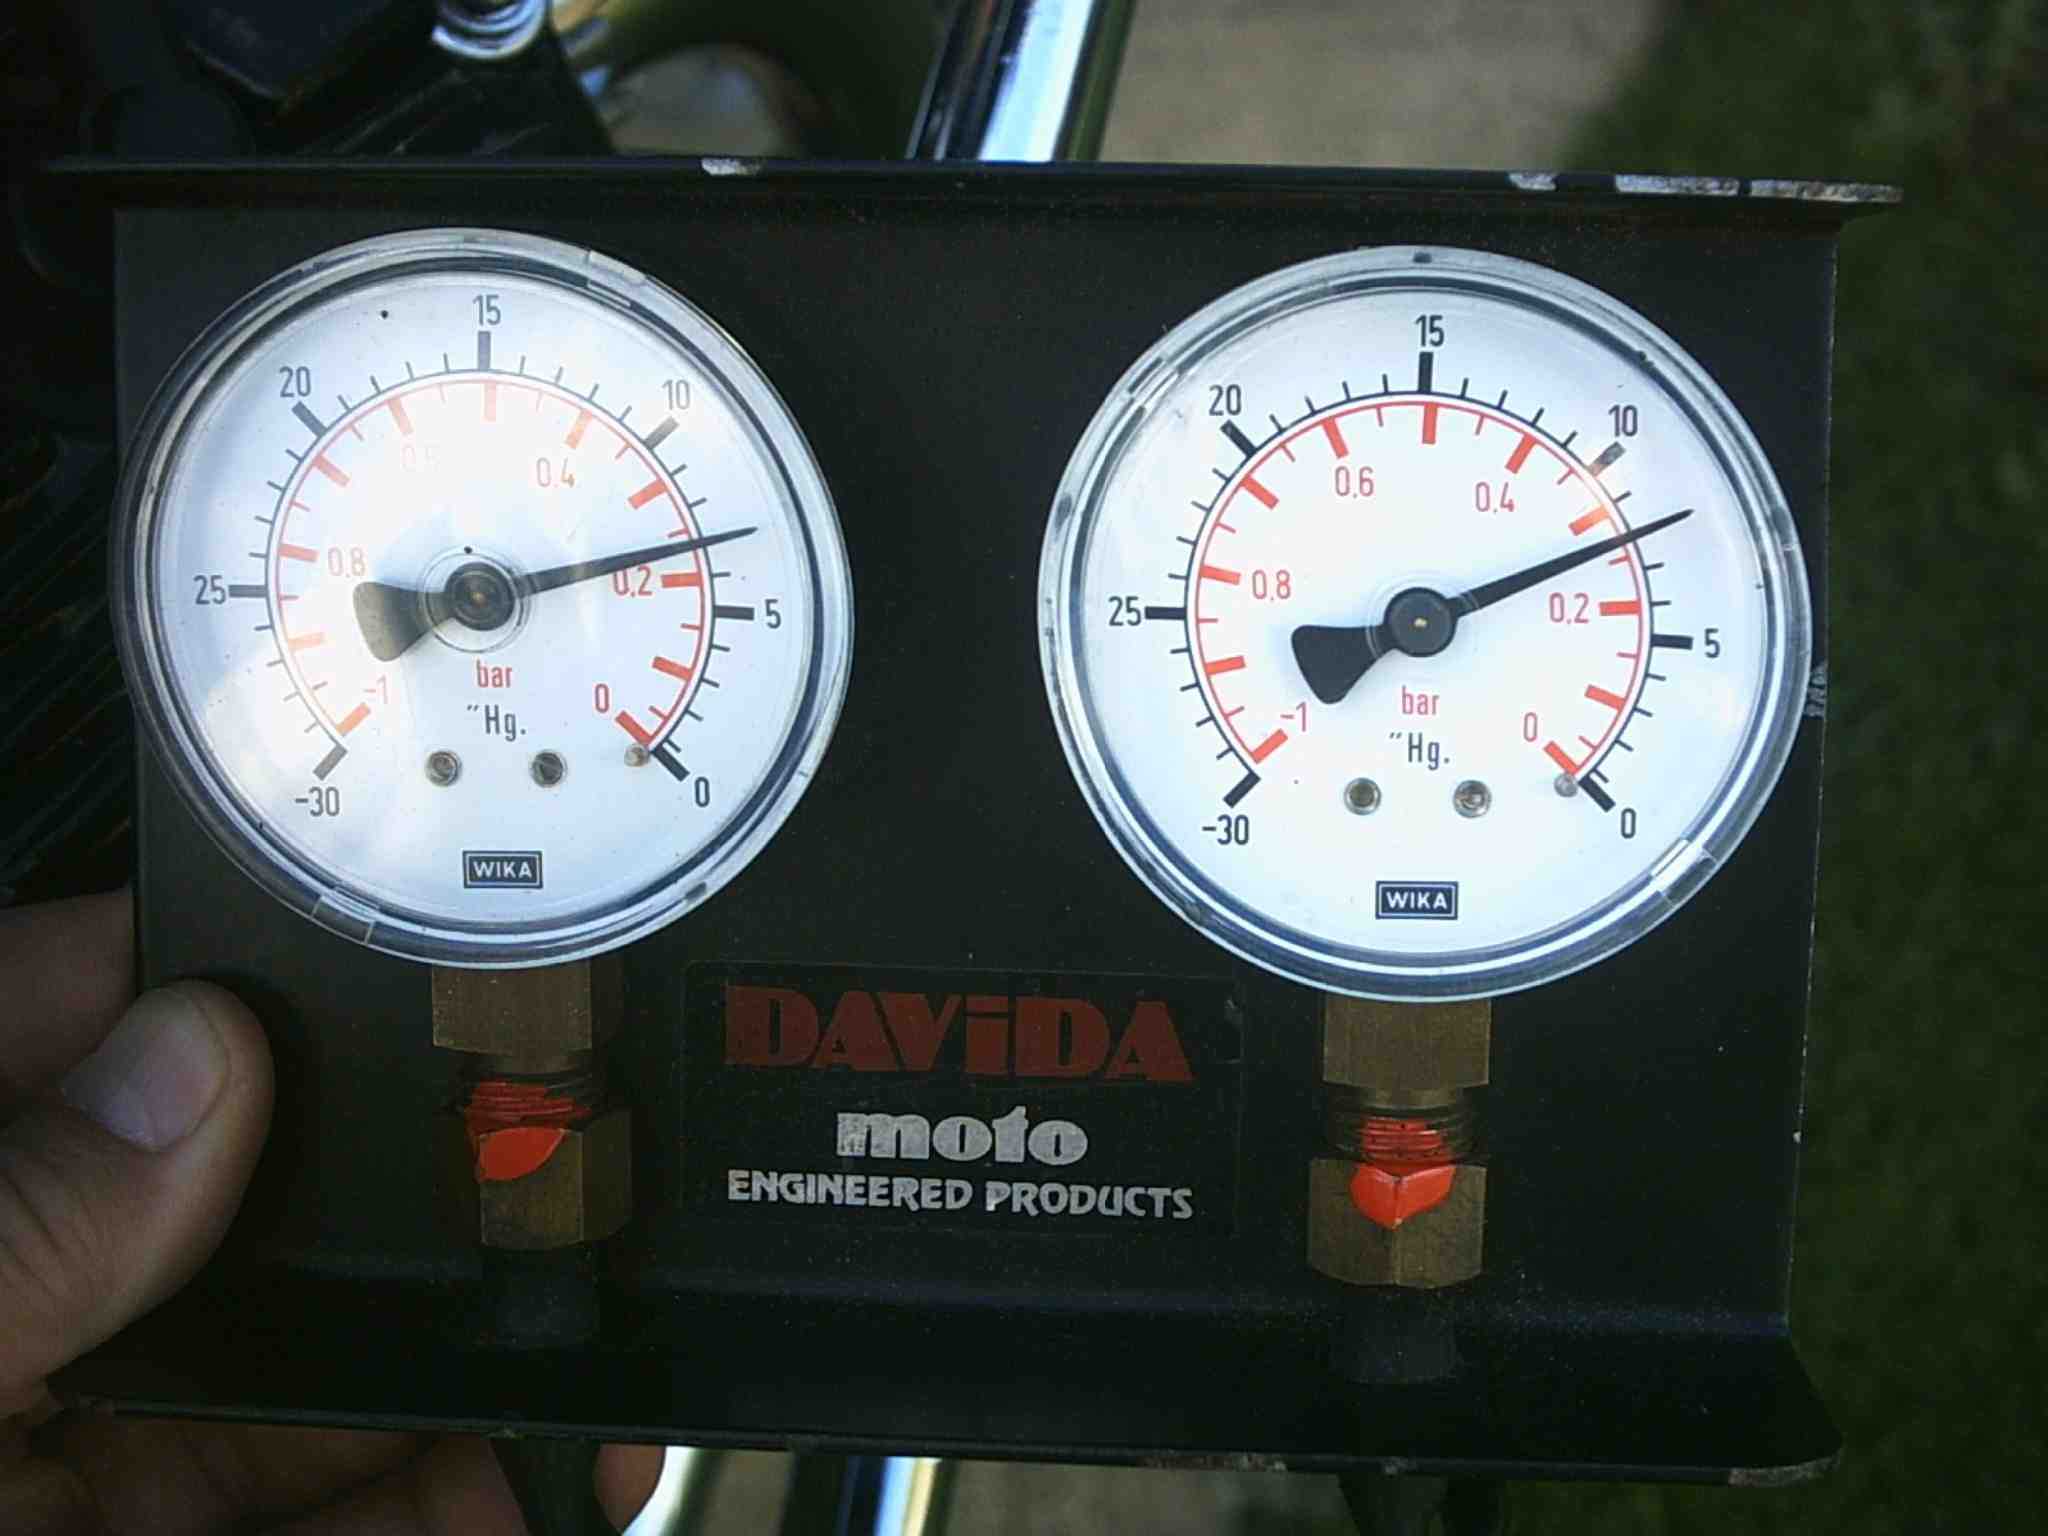 Run
the engine and allow it to idle at 1,100 rpm. Check the readings on the vacuum
gauges. It does not matter what they are, as long as they are exactly - and
I mean, EXACTLY - the same. Even a needle width's difference will require
adjustment. On the photo here, the two cylinders are well out
of synch.
Run
the engine and allow it to idle at 1,100 rpm. Check the readings on the vacuum
gauges. It does not matter what they are, as long as they are exactly - and
I mean, EXACTLY - the same. Even a needle width's difference will require
adjustment. On the photo here, the two cylinders are well out
of synch.
If they are precisely in synch, you're in luck. Remove the gauges, replace the port screws, you're done.
Usually, they aren't. Read on.
A Balancing Act
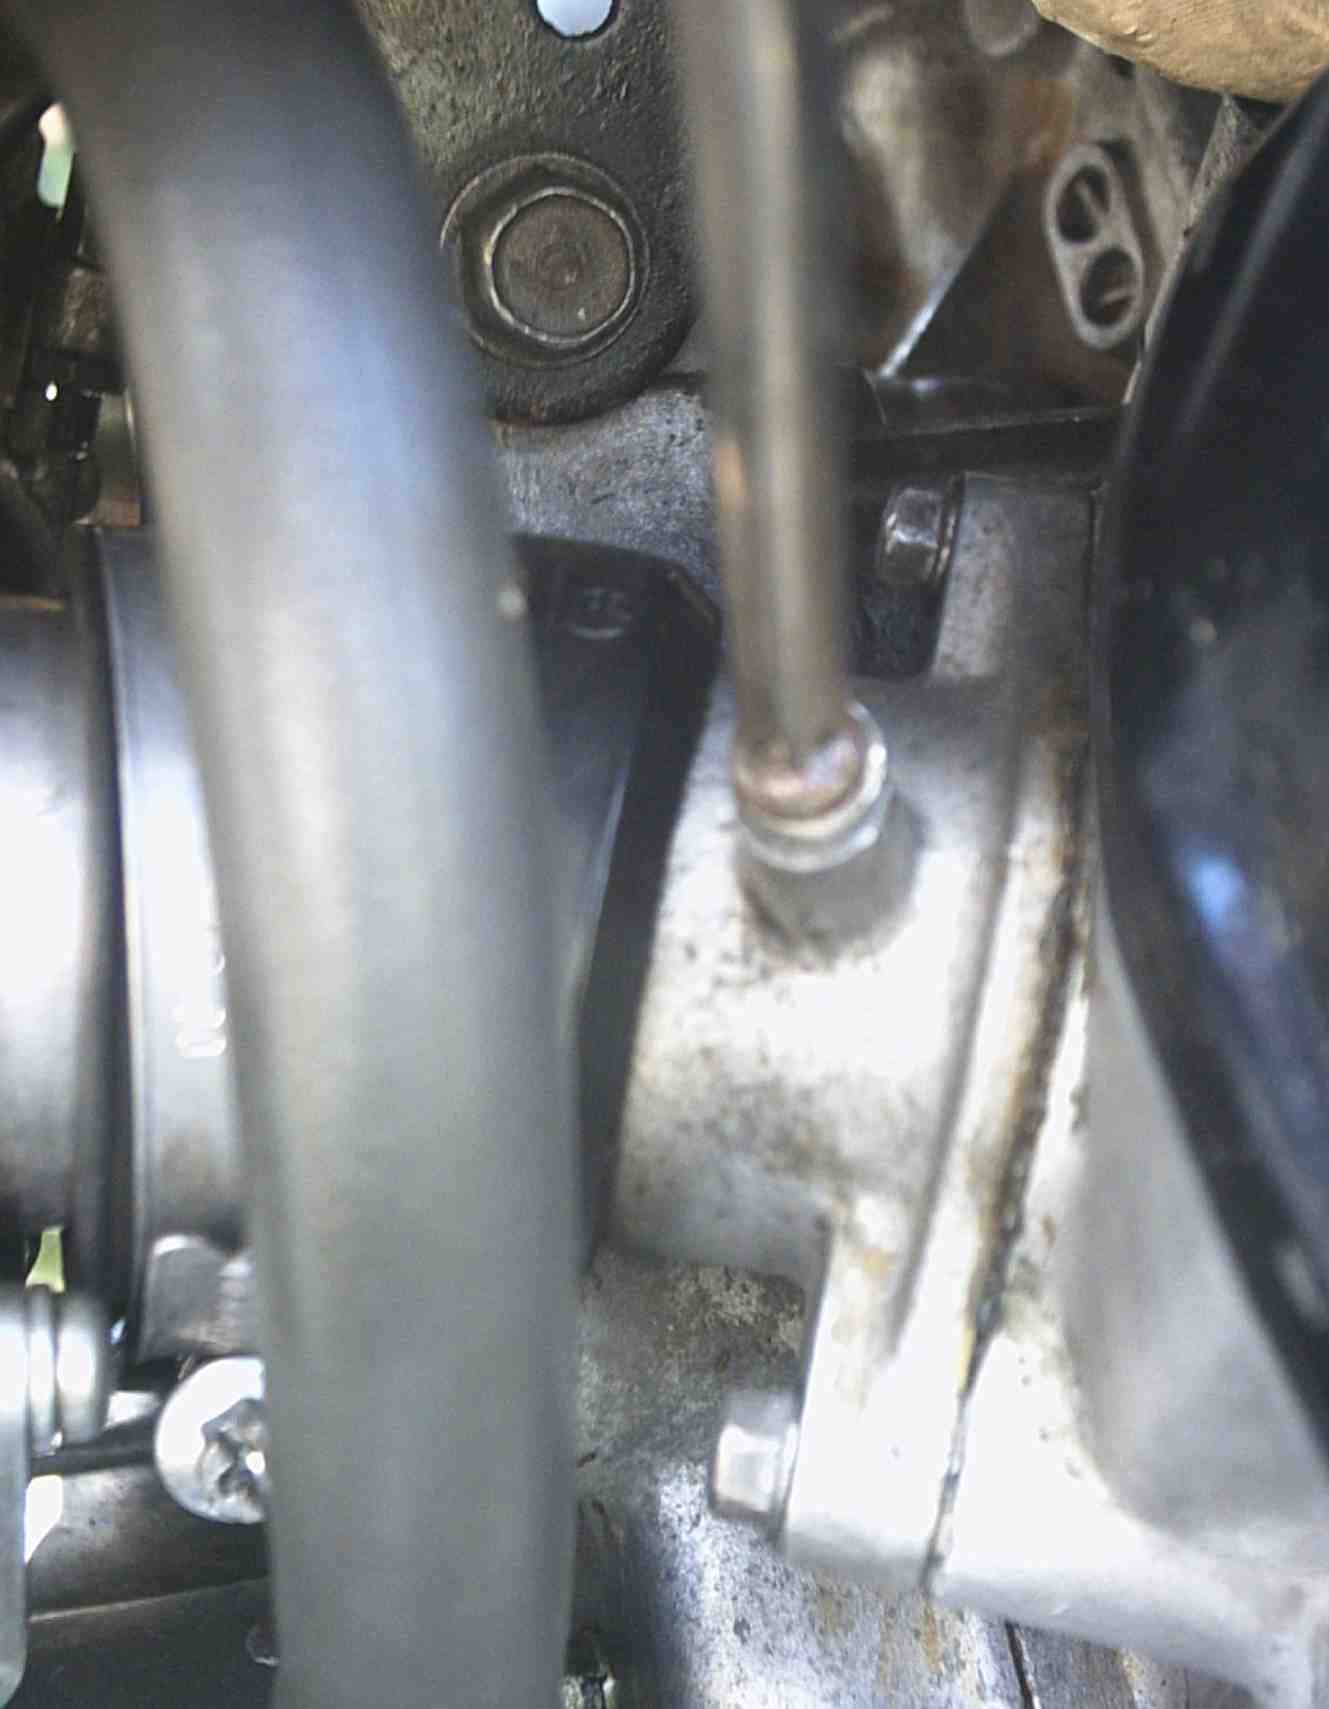
Although the two carbs are expected to work as a matched pair, the throttle cable only operates on the left hand carb. The other one is linked to the mechanism by a spring loaded bar which is retained against the other carb's mechanism by a tiny adjusting screw and locknut. Twiddling this screw makes minuscule adjustments in the way the left mechanism sits in relation to the right mechanism.
This linkage is not under any great force, and you'd think that once it was set up, it'd never need re-adjusting. However, factors such as inlet and exhaust valve wear, piston and fuel jet wear, general engine deterioration, and how many munchies the cat had for breakfast means that as the 1000s of miles go by, the carbs gradually drop out of tune with one another.
The tricky part is that the screw and locknut are tough to get at because the frame is in the way. So the task of adjusting the screw and re-tightening the locknut without disturbing the adjusting screw is a bit of an art, and can be frustrating. The good news is that GL and Eurosport 500, and all 650 owners have it much easier than Z, A, B or C owners. Either way, make sure the carbs have a full fill of fuel, or rig up a temporary fuel supply (beware of fire).
Stop the engine and remove the petrol tank and saddle.
If you have a Z, A, B or C, remove the 2 x 12mm and single 14mm bolts and then the left hand triangle plate directly in front of the carburettors, loosen the 10mm bolt holding the left hand coil to the main spar and swing the coil upwards out of the way. Don't disconnect it from either the sparking plug or the CDI unit. You will see that the main spar seriously impedes access to the between-carburettor area.
GL and Eurosport 500, and all 650 owners, you will see that the triple spar gives excellent access to the between-carburettor area!
Locate the carburettor actuating mechanism. If you can't spot it, twist the throttle and you'll see it at once.
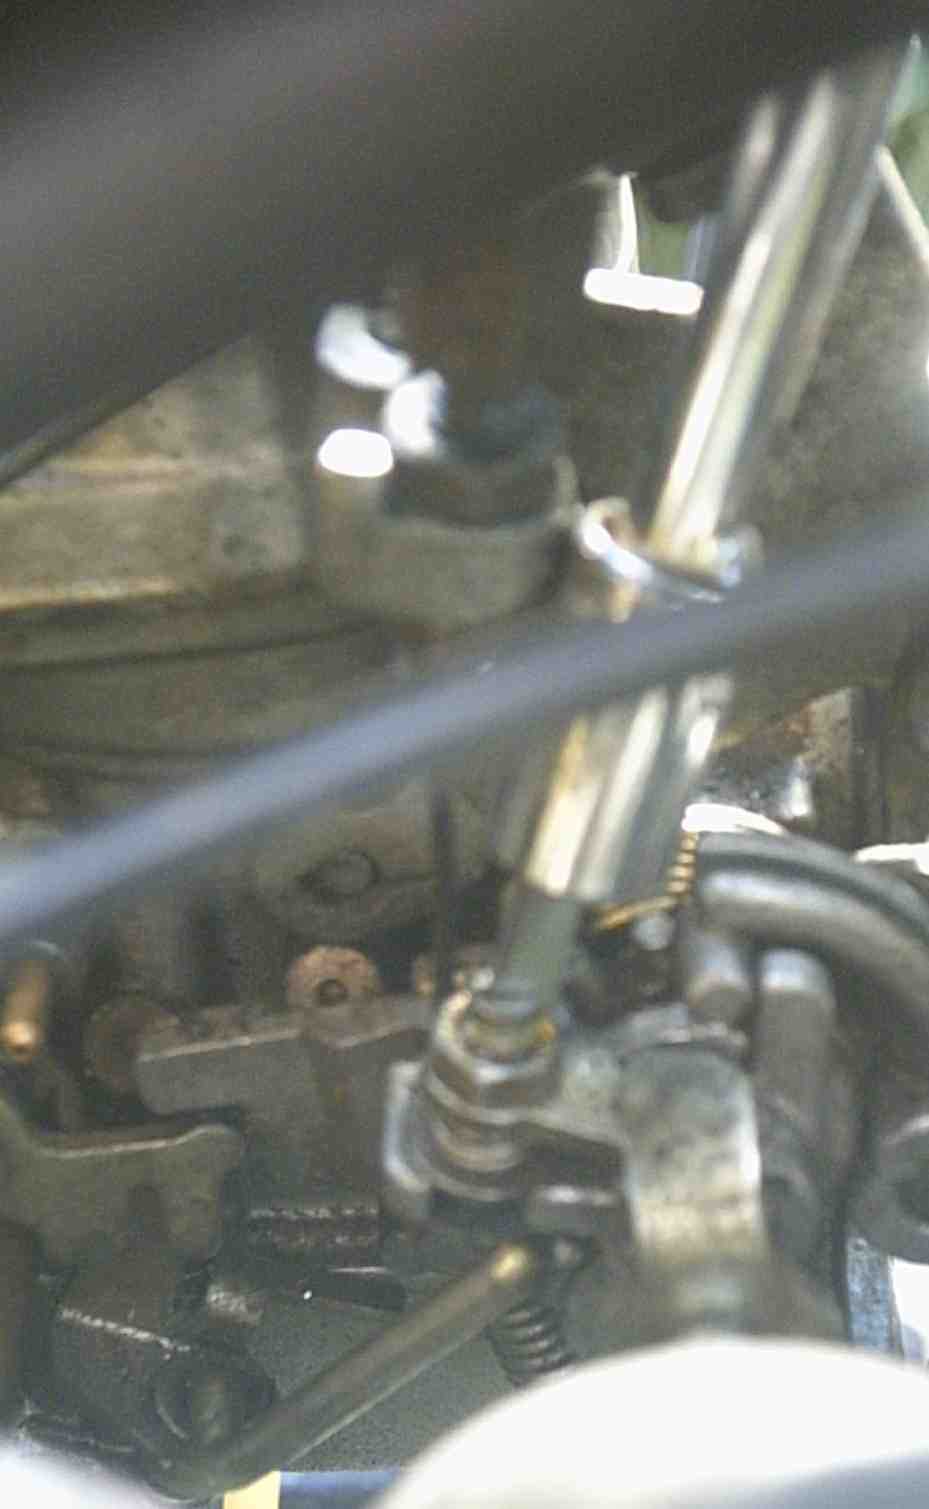 I've
left this picture large so that you can see how the mechanism is adjusted. Note
that each carb has a small brass nozzle with tiny holes in. These two nozzles
face each other and look as if they should be connected to something, but they
are just vents.
I've
left this picture large so that you can see how the mechanism is adjusted. Note
that each carb has a small brass nozzle with tiny holes in. These two nozzles
face each other and look as if they should be connected to something, but they
are just vents.
If you don't have the special tool, use an 8mm ring spanner to loosen the locknut. You may have to break off a splodge of locking solution or yellow paint, this is ok. Reach in from above and locate the screwdriver through the ring spanner and onto the adjusting screw.
The special tool makes this much easier, as you see from the picture. In either case, when adjusting the linkage, don't push downwards. There is a small spring which acts as a cushion in the mechanism, and a downwards pressure on the the adjusting screw will give a false reading.
Now start the engine and allow it to idle. Whilst closely watching the vacuum gauges, tweak the adjusting screw 1/16 of a turn.
If the left cylinder is reading higher than the right cylinder, unscrew (anti clockwise) the adjusting screw.
If the left cylinder is reading lower than the right cylinder, screw in (clockwise) the adjusting screw
When both gauges are PRECISELY the same, with no visible difference between the readings, tighten the locknut, taking great care not to move the adjusting screw.
Remove the tools and restart the engine.
You will probably have to make some allowance for the fact that tightening the locknut does in fact move things out of synch, no matter how careful you are in holding the screwdriver rigidly.
Be prepared to make several goes at this process - I'm warning you - it can take 5 minutes or an hour, but really it's definitely worth all the trouble. A well balanced engine sounds terrific, and purrs like a kitten when you trundle along at 30 mph in top gear - as well as idling easily and cleanly.
An extended adjustment session will mean that the carburettors are emptied of fuel. Rest the petrol tank on its mounts and reconnect the petrol supply temporarily, to allow the float chambers to refill. Then take the tank off again and continue your balancing act. If you can rig up a temporary fuel feed, this is a good idea, but don't spill petrol on the hot exhaust.
When the job is done, drop some silicon goo or locking compound on the locknut so that its can't vibrate loose. Remove your tools and replace any removed mounting plates, put back the tank and saddle, reconnect the fuel supply and replace the screws in the vacuum ports - don't forget the sealing washers.
Nigel Bird adds "After getting the carbs in balance, blip the throttle. The carbs should settle back to the same balanced position. If they don't, check for air leaks at (a) head/inlet joint and (b) all jubilie clips (do not over thighten these as this will cause the inlet rubbers to split just in front of the moulding for the clip).
"If this does not cure the
problem, remove the carb tops and clean the piston and chamber. Then replace
the piston in the top without the spring, and try to move from side to side.
NO movement should be felt at all. Next, move to about 2 1/4 inches from the
rim of the top, and try again. Any movement here means a loss of vacuum at idle,
causing rough running at idle, and on part throttle the only cure is too replace
the tops/piston sets."
Backfiring and Popping on the Over-run
This embarrassing problem is almost always caused by the mixture of fuel and air at idle speeds is either simply too lean - i.e. it does not have enough petrol, or too rich (too much petrol). This is easily addressed. On the underside of each carb body is either a small brass screw or a dull aluminium knob with a tiny tongue on it. If you have the accelerator pump under the left hand carb body, then you will not have the brass screw type of air jet. Screwing the pilot jets in (upwards) increases the amount of air, weakening the mixture; screwing them out (downwards) increases the amount of petrol, richening the mixture.
If you have the knobbly type, these are restricted to almost one turn of adjustment which is usually not enough to stop popping on the over-run. Here in the UK we don't have such draconian emission laws as in the US, so you follow these instructions at your own risk! In the US / Canada you may infringe your local or national emission laws.
If you have the knobbly type, use a hacksaw to remove a tiny piece of aluminium from the underside of the carburettor float bowl, so that the knobbly screw can be rotated without fouling the float bowl. Then dress the cut away edge with a fine file and use a fingertip of dirt to mark the metal and conceal the tiny surgery.
If you have the brass screws you need do nothing to free them up.
Warm the engine to normal temperature. It is best to balance the carbs first on vacuum gauges if you can. Stop the engine. Clean and reset the plugs. On each cylinder in turn, screw the air jet all the way in and then out by 2½ turns. Restart the engine and set the idle speed to 1,100 rpm on the large black knob under the carburettors.
Tweak the left hand air jet 1/8 of a turn each way until the engine revs are at the maximum you can get. Reset the idle speed back to 1,100 rpm.
Repeat with the right hand air jet.
Road test - cruise at 70 or 80 and shut the throttle sharply, allowing the engine to over-run for as long as you can - at least 5 seconds. A long downhill slope will help you a lot. You should only get a gentle bubbling noise, but you might get a popping. If this happens as soon as you shut off, adjust the jet screws by 1/8 of a turn and test again, until the popping stops. Some trial-and-error is called for, because engines and carbs differ a lot as they age.
Popping will probably still happen after a very long overrun, say down a long steep hill. This is normal.
If there is no popping, turn both jets out (screw downwards) by 1/8 of a turn until you get popping, then put them back in by 1/8 of a turn.
Paul Middleton says "I used a short length of 6mm reticulation tube which fits tightly over the knurled screws with a T on the end of each. Makes adjusting much easier especially one the move."
This procedure usually involves some
experimentation but it's worth the trouble to get the motor sounding sweet.
You are welcome to comment on these pages.